Garden excavation and soil preparation guide: step-by-step process
Prace ziemne na działce budowlanej obejmują zdjęcie humusu, niwelację, nadanie spadków, wykopy pod instalacje i nawierzchnie oraz dowiezienie i rozplantowanie ziemi, aby teren był stabilny i prawidłowo odprowadzał wodę. Dobrze zaplanowane poziomy i kolejność robót ograniczają koszty poprawek, problemy z zastoiskiem wody i późniejsze osiadanie nawierzchni.
TL;DR
- Prace ziemne zaczyna się od wyznaczenia punktu „0” i poziomów terenu, bo od tego zależą spadki, odwodnienie i ilość ziemi do dowiezienia.
- Kluczowe etapy to zdjęcie humusu, niwelacja, nadanie spadków, wykopy pod instalacje i korytowanie pod nawierzchnie.
- Po dowiezieniu warstwy ziemi powyżej 20 cm teren musi osiąść, więc finalne równanie i zakładanie trawnika warto odłożyć do stabilizacji gruntu.
- Większość robót wykonuje się maszynami, a prace ręczne zostawia na wykończenia i miejsca niedostępne dla sprzętu.
- Jakość ziemi ogrodowej ma znaczenie, dlatego przed zakupem warto sprawdzić pH, strukturę, próchnicę i brak zanieczyszczeń.
Published
30 October 2026
Share this article


 Copied
TOC
- Garden excavation and soil preparation guide
- Why is proper excavation planning important?
- How to conduct excavation step by step
- Main excavation work - site leveling
- Cleanup and finishing work
- Summary and tips
- Garden soil parameters – what to pay attention to
- Soil types – which to choose for garden
- Tools useful for excavation work
- Common problems during excavation work
- Transform your outdoor space with professional design
- Frequently asked questions
- What are excavation works and what do they include?
- What types of excavations do we distinguish in construction and what are their applications?
- How much soil is needed for a garden?
- What equipment is needed for comprehensive excavation work?
- When should soil reinforcement or formwork be used in excavations?
- How much does excavation cost per yard and what affects pricing?
- What are the main challenges in garden excavation projects?
- How do you calculate soil volume for excavation projects?
- What safety measures are required during excavation work?
- How long should soil settle before proceeding with landscaping?
Garden excavation and soil preparation guide
After completing site restoration, we can move on to the next stage. Excavation work is an important step in building residential gardens and green spaces. The most commonly performed basic earthwork operations on construction sites include:
- Removal and stockpiling of topsoil layer
- Site leveling, creating slopes, and finishing earthwork
- Soil excavation for paths, patios, and driveways
- Soil fertilization and spreading
- Linear excavations and drainage
- Forming ditches, embankments, and berms
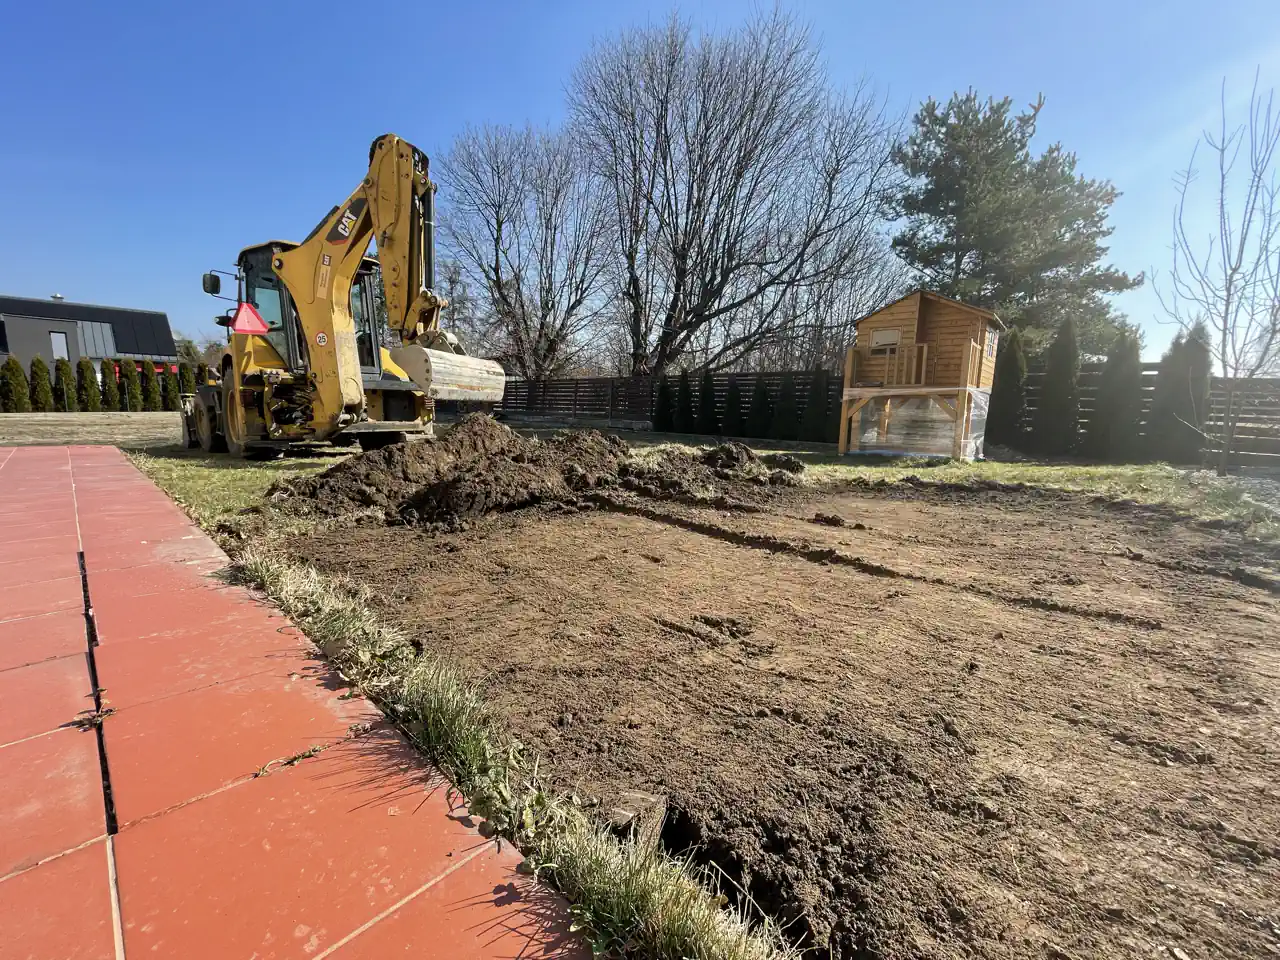
All indicated work is carried out mainly using appropriate construction machinery. Hand excavation work represents a very small portion of garden installation projects. Even for minor tasks in small gardens, it's worth using specialized equipment for efficient site preparation.
Why is proper excavation planning important?
Properly planned site preparation is crucial for your garden to remain in good condition for years. At this stage of work, a well-thought-out garden design is important, which anticipates the functionality and shape of the future garden.
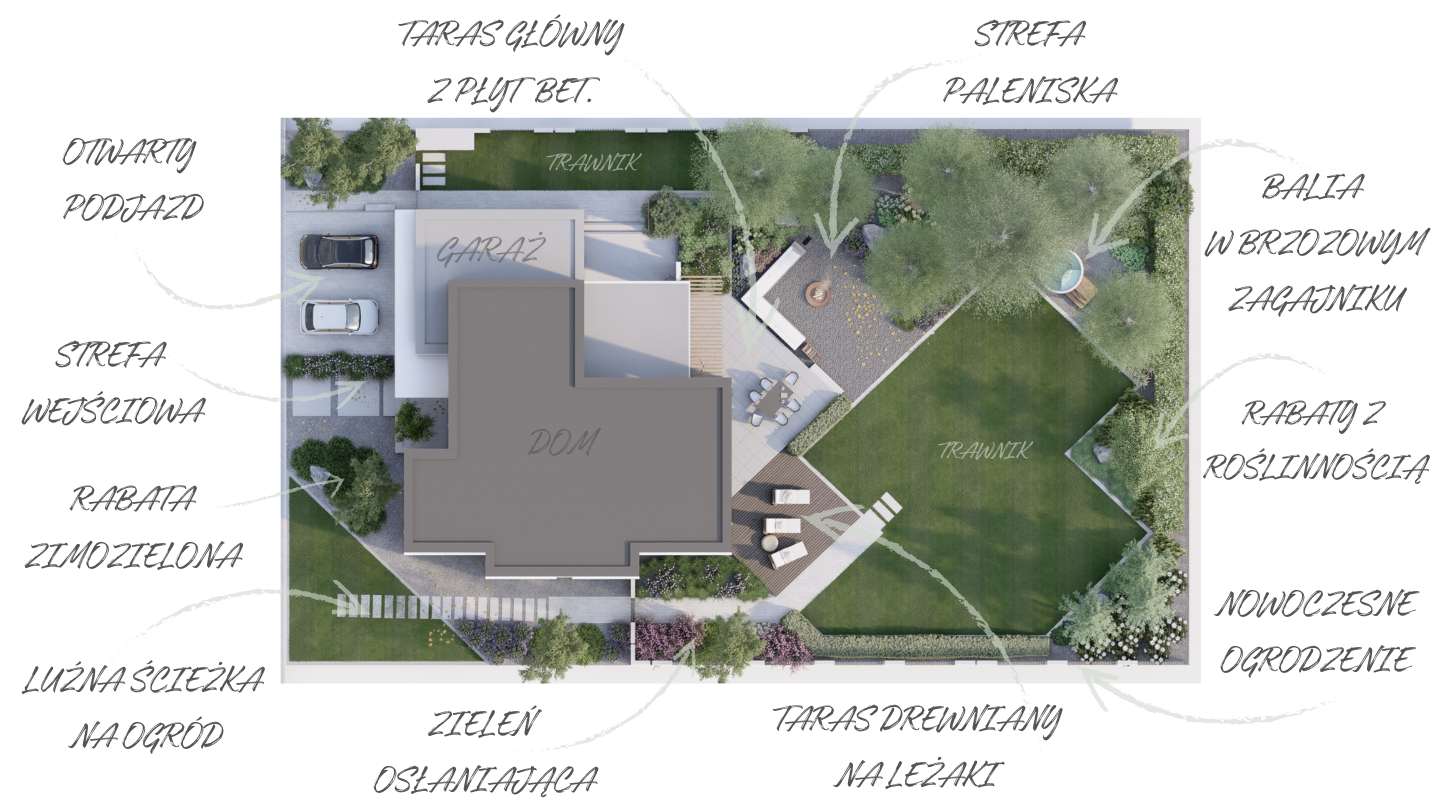
Proper garden layout, planning flower beds, lawn areas, garden zones, and levels helps avoid future problems and unexpected expenses. What benefits does proper planning bring?
- Cost reduction – you avoid unnecessary expenses resulting from errors or unforeseen changes during construction
- Time savings – a detailed plan enables more efficient work execution, minimizing downtime
- Work schedule – remember that soil needs time to properly stabilize
- Fewer technical problems – appropriate actions prevent erosion, ground settling, or water accumulation
- Better land use – precise planning enables optimal use of available space and soil resources on the property
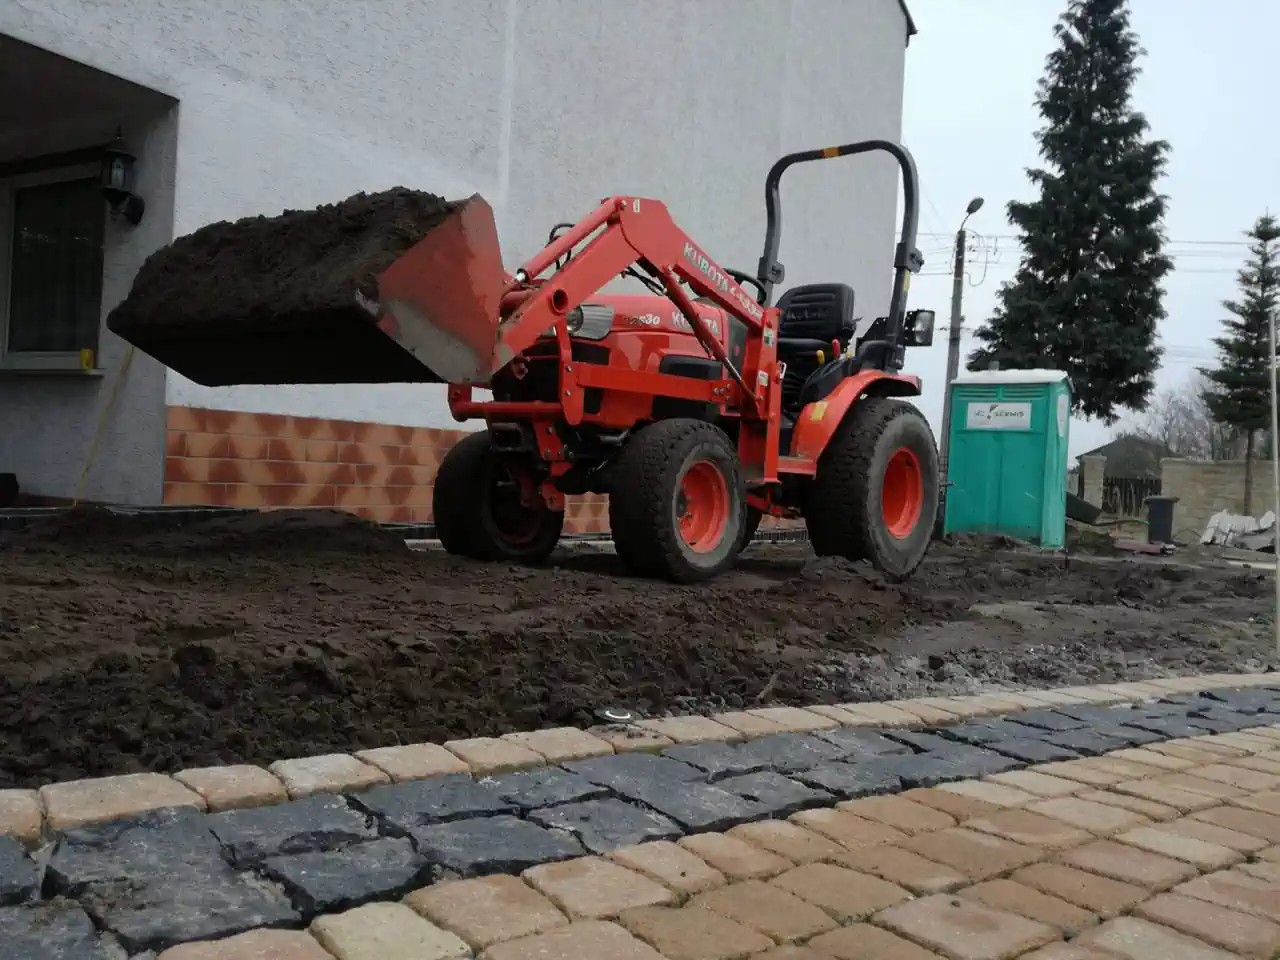
The type of excavation work must be adapted to the specifics of the site and soil type. Their scope depends on user needs and the home budget allocated during garden design planning. Thanks to proper preparation, your garden will gain functionality, and you'll save money.
How to conduct excavation step by step
Garden grading is a key stage of excavation work aimed at adapting the site surface to the intended levels included in the garden design. It includes removing all unevenness, creating appropriate slopes, and preparing the substrate for future installations, plantings, and lawn.
See how site leveling works using a mini loader. Next, we'll present step by step how to plan individual stages of excavation work to achieve the best effect.
Planning levels - design documentation
An experienced landscape architect based on topographic maps, photos, and measurements can plan the terrain according to the owner's expectations and budget. If you don't have a garden design:
- First, read our comprehensive guide on how to start a garden from scratch.
- It's also worth knowing how to plan garden zones effectively.
- You can also commission this type of garden project planning work from our company.

Having a garden plan and appropriate design documentation, you can easily move to the next stage.
Height marking
Before the contractor arrives with excavation equipment to your garden, it's worth having the heights of basic elements marked. This way you'll avoid errors in surface levels, water pooling, or overpaying for too much soil. Below I present a detailed height marking process:
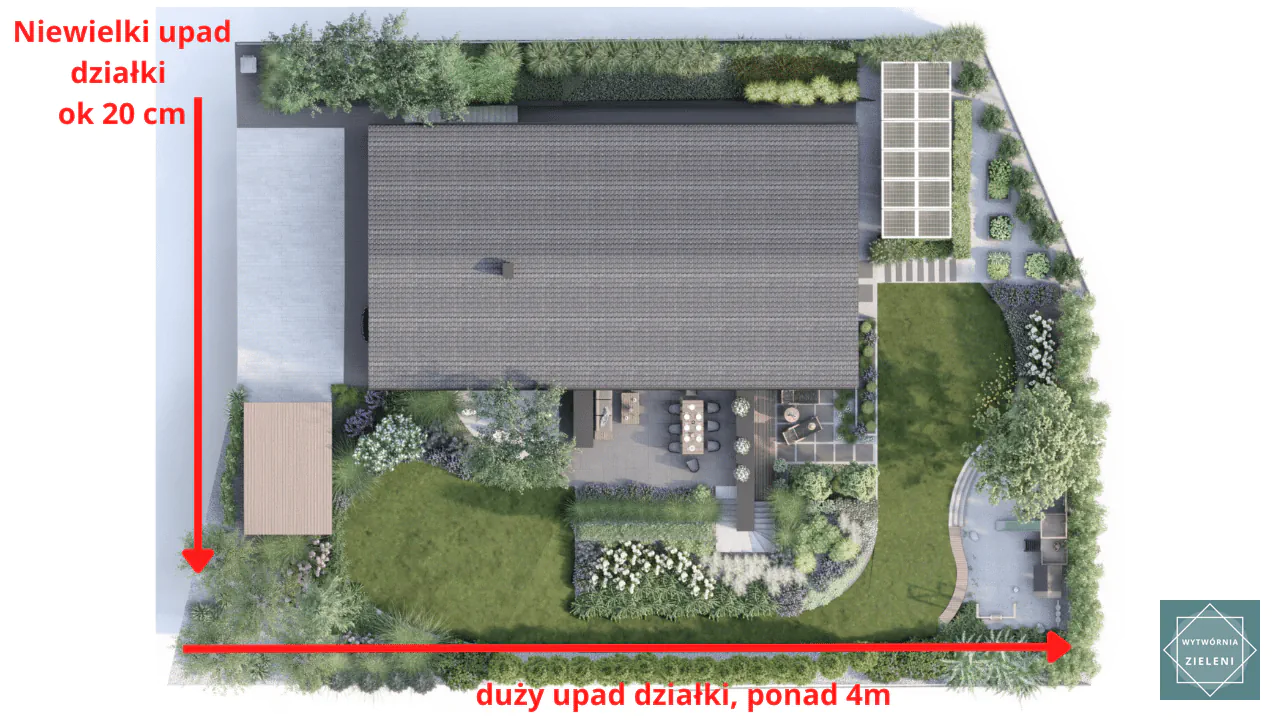
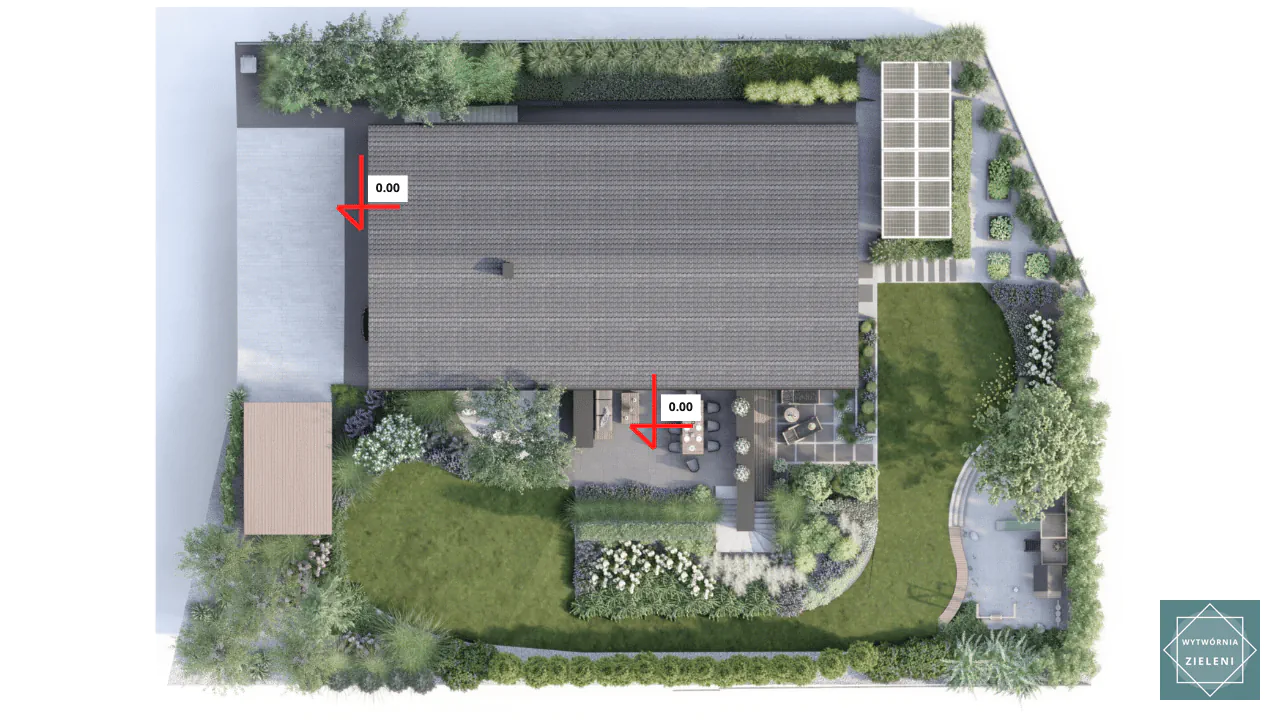
1. Set point 0
Setting level "0" is the first and most important step. Determine the base point of your building, e.g., patio threshold. This will be the so-called ZERO point (0), which will allow you to properly determine slopes so that water doesn't flood the building. All other heights in the garden will relate to it. This also makes it easier to plan excavation depths and elements such as ponds, pools, or drainage.
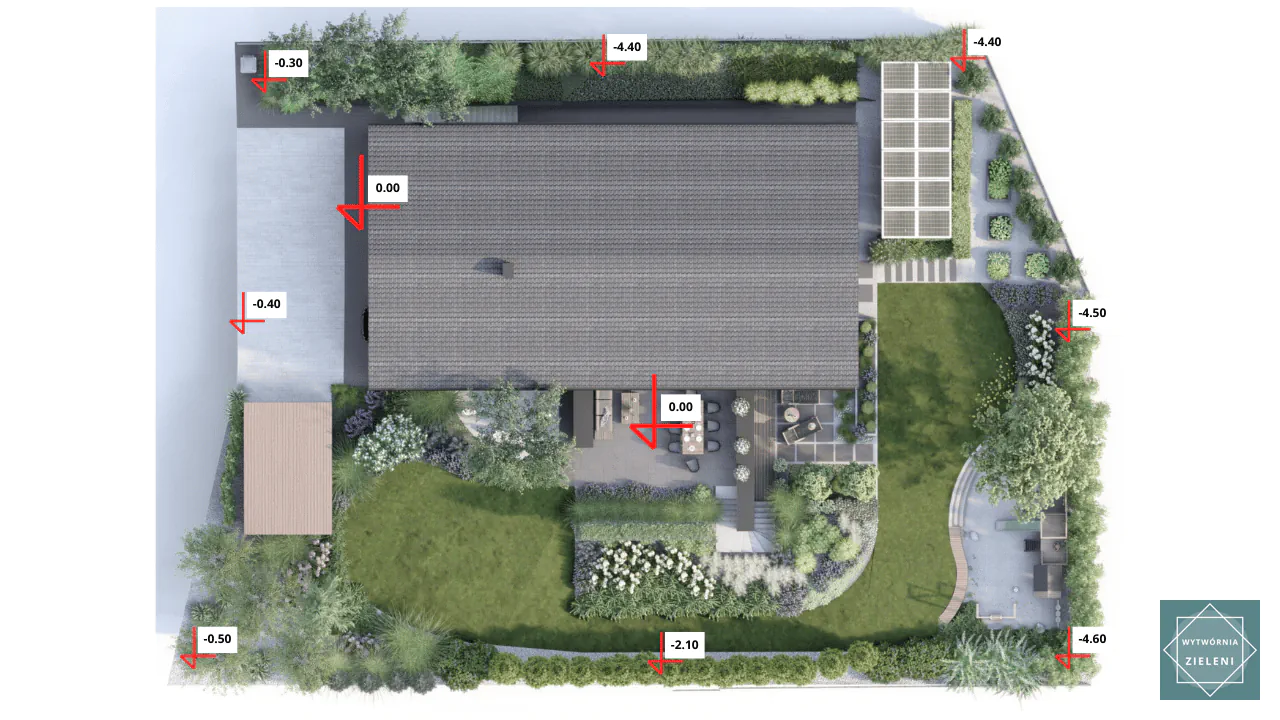
2. Determine site heights
Relative to point "0", establish the heights of all property corners. For greater precision, you can also measure height along the property sides, between its corners. This will provide more accurate measurements and facilitate future calculations.
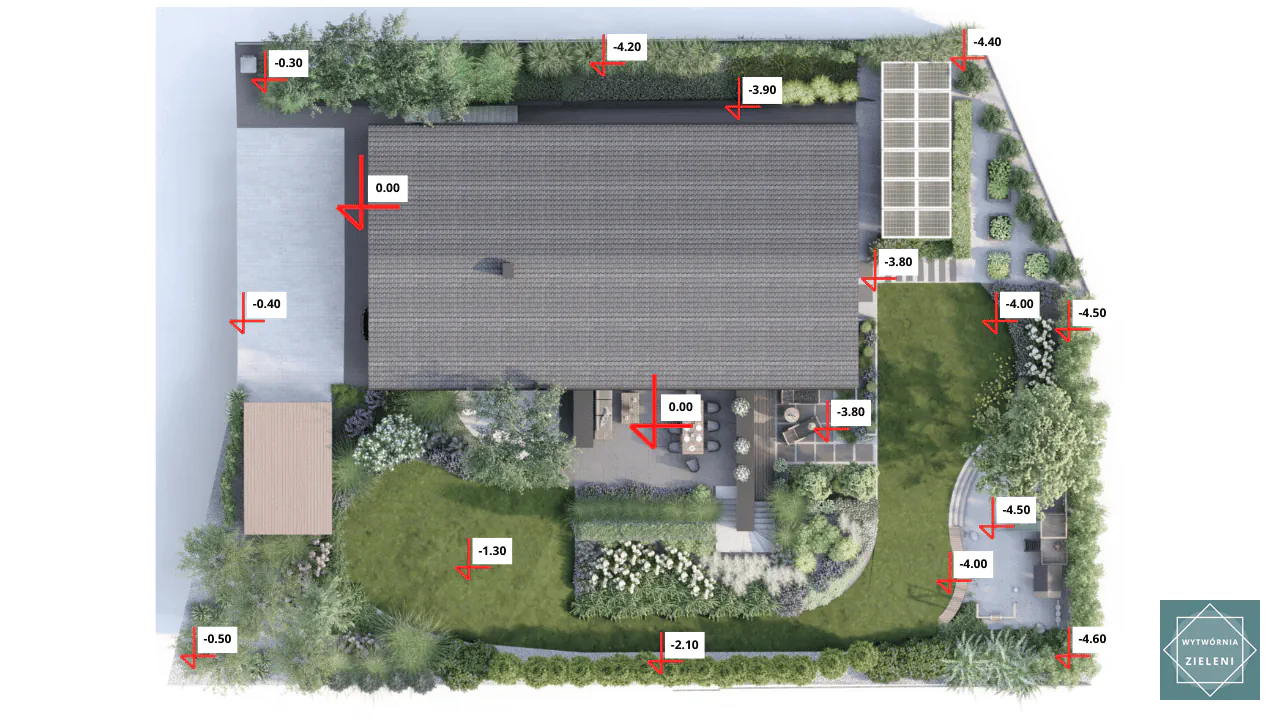
3. Determine heights of individual terrain elements
Based on point "0", establish the heights of key garden elements. Examples:
- Slopes from building – minimum 1-2% slope (1.2-2.4 inches per 10 feet) for
- Paths and driveways – height according to design, maintain their 2-3% slope per 10 feet
- Patios and recreation areas – at the same level as the building or slightly lowered
- Lawn – adapted to surrounding paths and garden beds
- Garden beds and retaining walls – adapted to terrain shaping
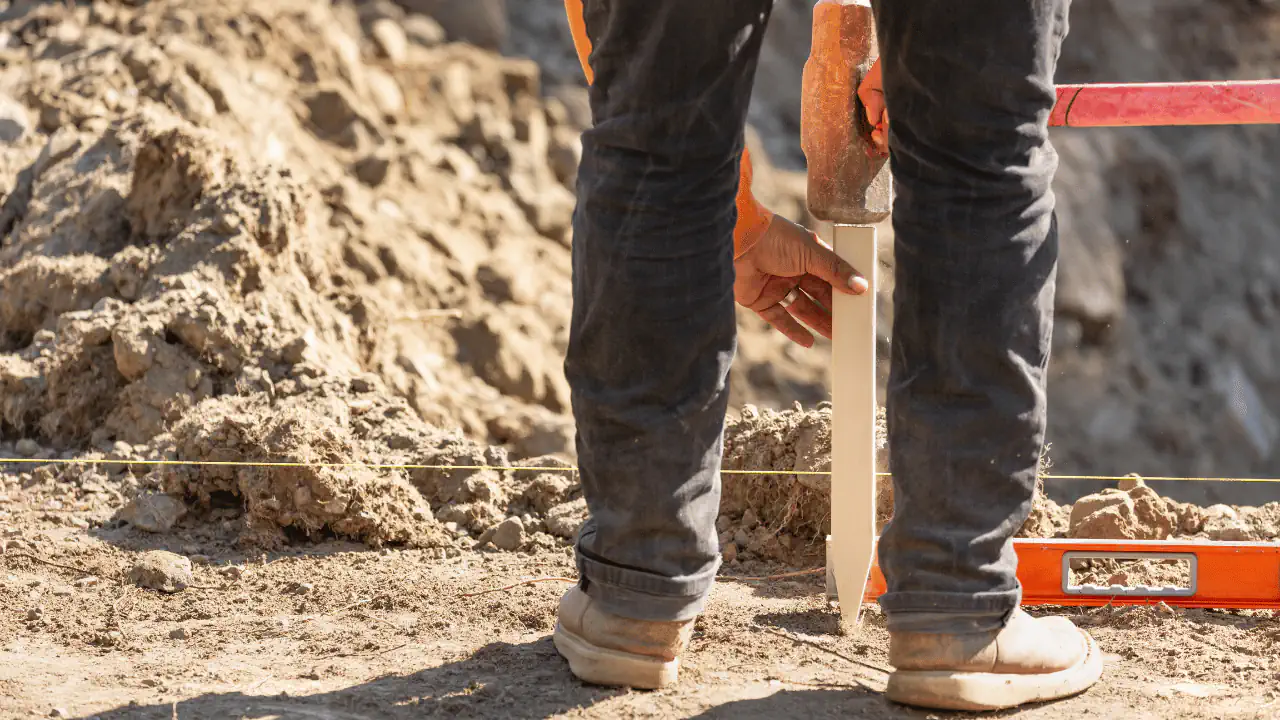
4. Drive stakes to determine levels
In places important for the design (e.g., patio corners, path edges, points of height change), drive wooden stakes. Mark target heights on them using nails, paint, or tape.
5. Stretch strings
Between stakes, stretch strings at marked levels. They will help visualize height differences and enable precise earthwork execution. If necessary, correct heights and make sure slopes comply with design and assumptions.

Main excavation work - site leveling
After determining terrain levels, it may be necessary to bring soil to the entire site or selected areas. A well-thought-out process allows achieving the expected effect and avoiding costly corrections. Below we present key stages.
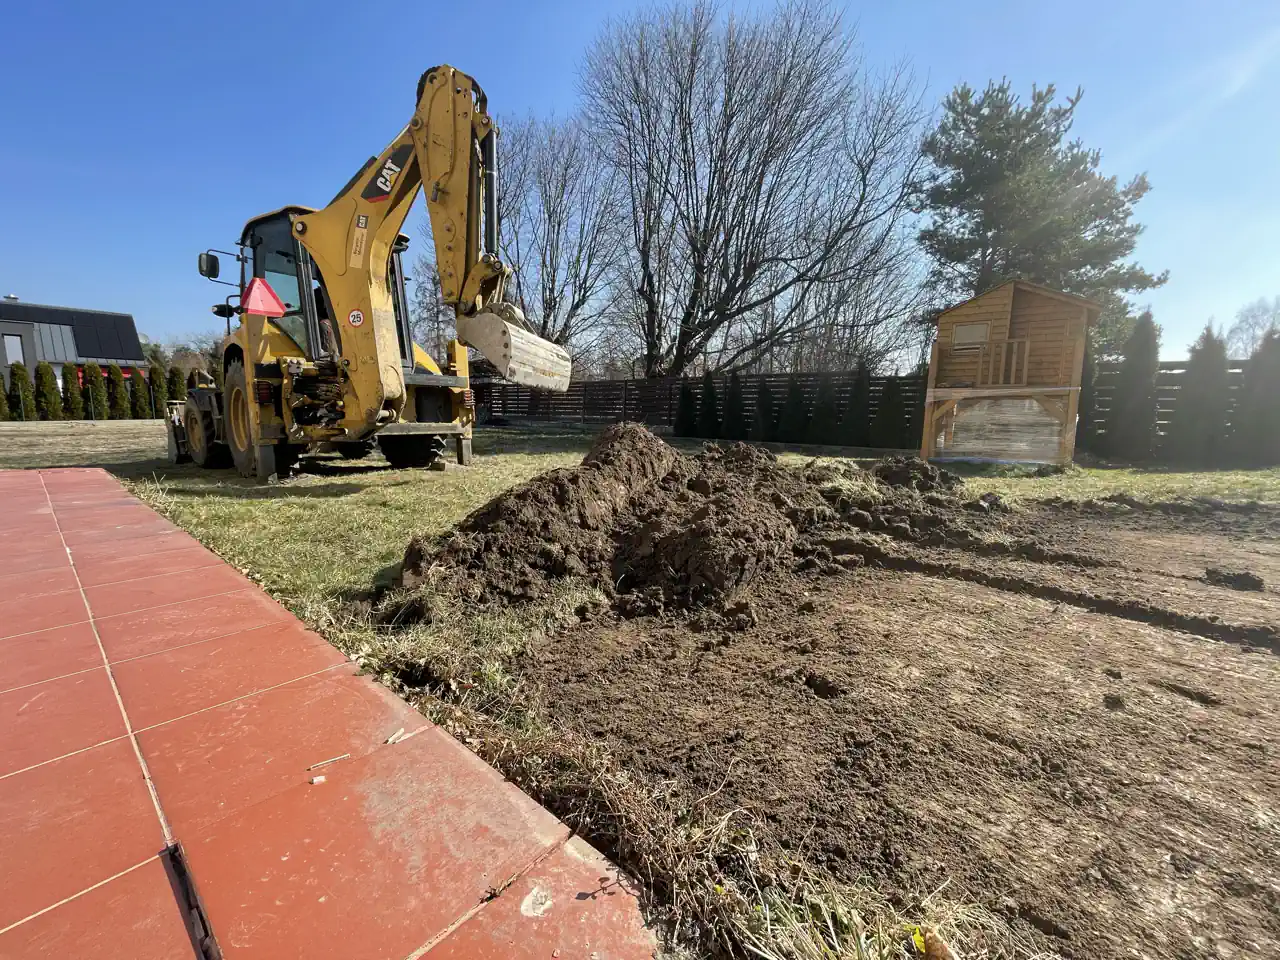
1. Removing excess soil, cutting hills and filling holes
Excess soil must be removed from places where terrain is too elevated to achieve appropriate levels. An excavator-loader allows quick collection of excess soil, and manual work is used in hard-to-reach places. Filling depressions and filling holes helps level terrain and create a uniform surface for subsequent work stages.
2. Creating slopes
To ensure proper water drainage, terrain must have appropriate inclination. Slopes are usually directed from the building toward the garden or drainage. This prevents water accumulation near foundations. For this purpose, soil is formed using an excavator, then levels are checked with a level, long spirit level, or string.
3. Soil delivery
If soil is lacking as a result of work, it's necessary to bring it in. For level supplementation, fertile soil is used (for lawn and beds) or lower quality soil (e.g., to supplement significant soil deficiency above 8 inches). Use our soil calculator to calculate how much soil per square yard will be needed for your garden.
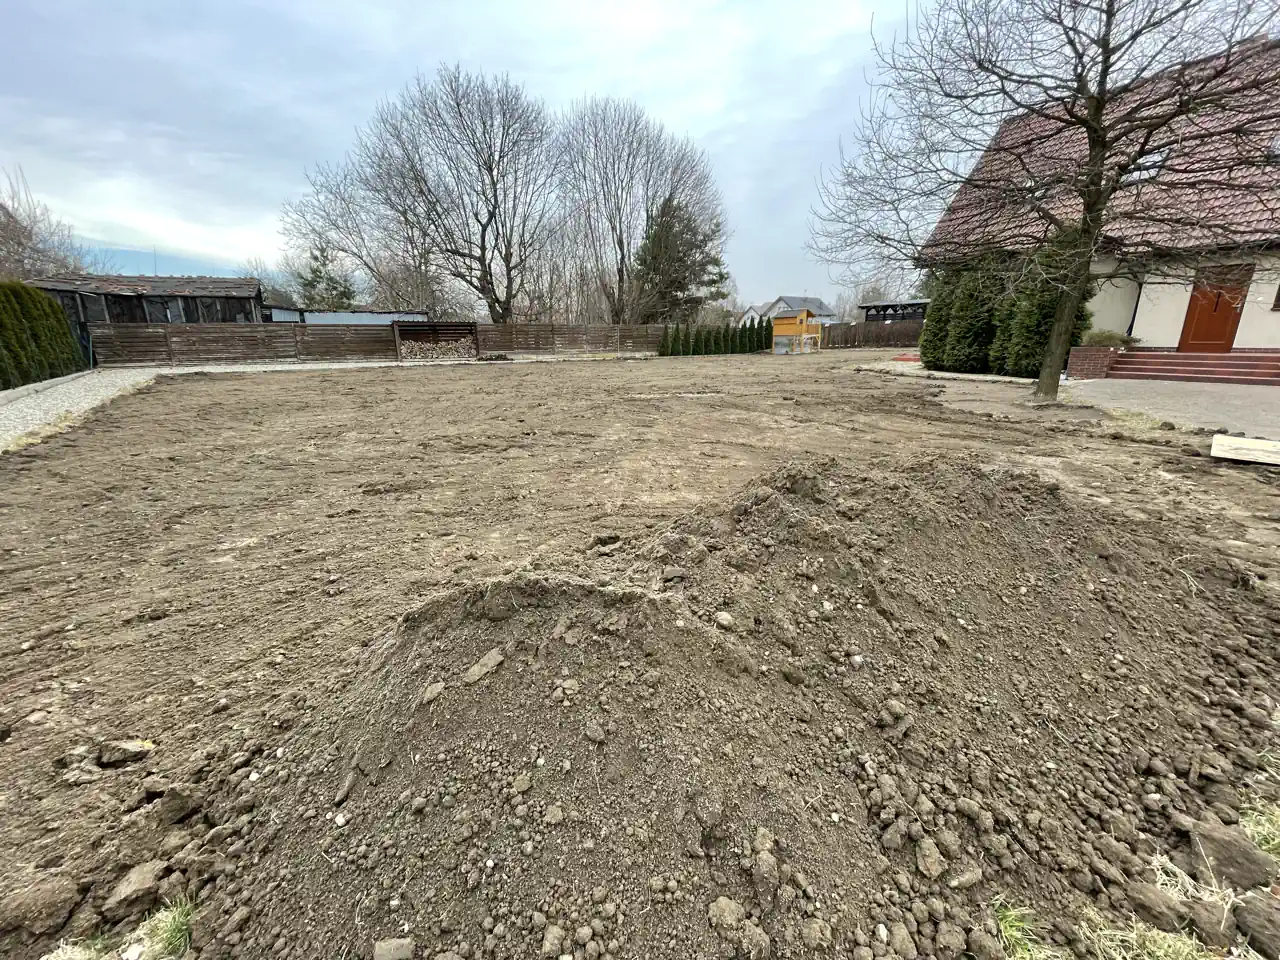
Cleanup and finishing work
The final stage consists of minor finishing work focusing on places inaccessible to heavy equipment and requiring manual finishing. Their goal is to organize terrain after main work. Proper cost estimation helps budget for these finishing touches effectively. The scope of work usually includes:
- Manual soil leveling in hard-to-reach places such as edges, spaces near fences, building walls, and narrow passages.
- Removing contamination, including large stones, organic matter residues, and waste from previous work.
These activities allow final terrain organization before subsequent development stages. If the amount of brought soil exceeds 8 inches, you shouldn't immediately proceed to further work. Terrain will naturally settle, so precise soil leveling at this stage doesn't make sense – it's worth waiting for its stabilization or accelerating this process by watering. Below is a short video presenting the target effect of the next stage - preparation for lawn and garden beds.
Summary and tips
Proper terrain level planning is crucial for further garden work. Appropriate slope creation and soil stabilization ensure surface durability and effective water drainage. Thanks to this, subsequent stages such as lawn installation, plant planting, or surface installation will proceed smoothly without the need for corrections what is very important for small and large gardens.
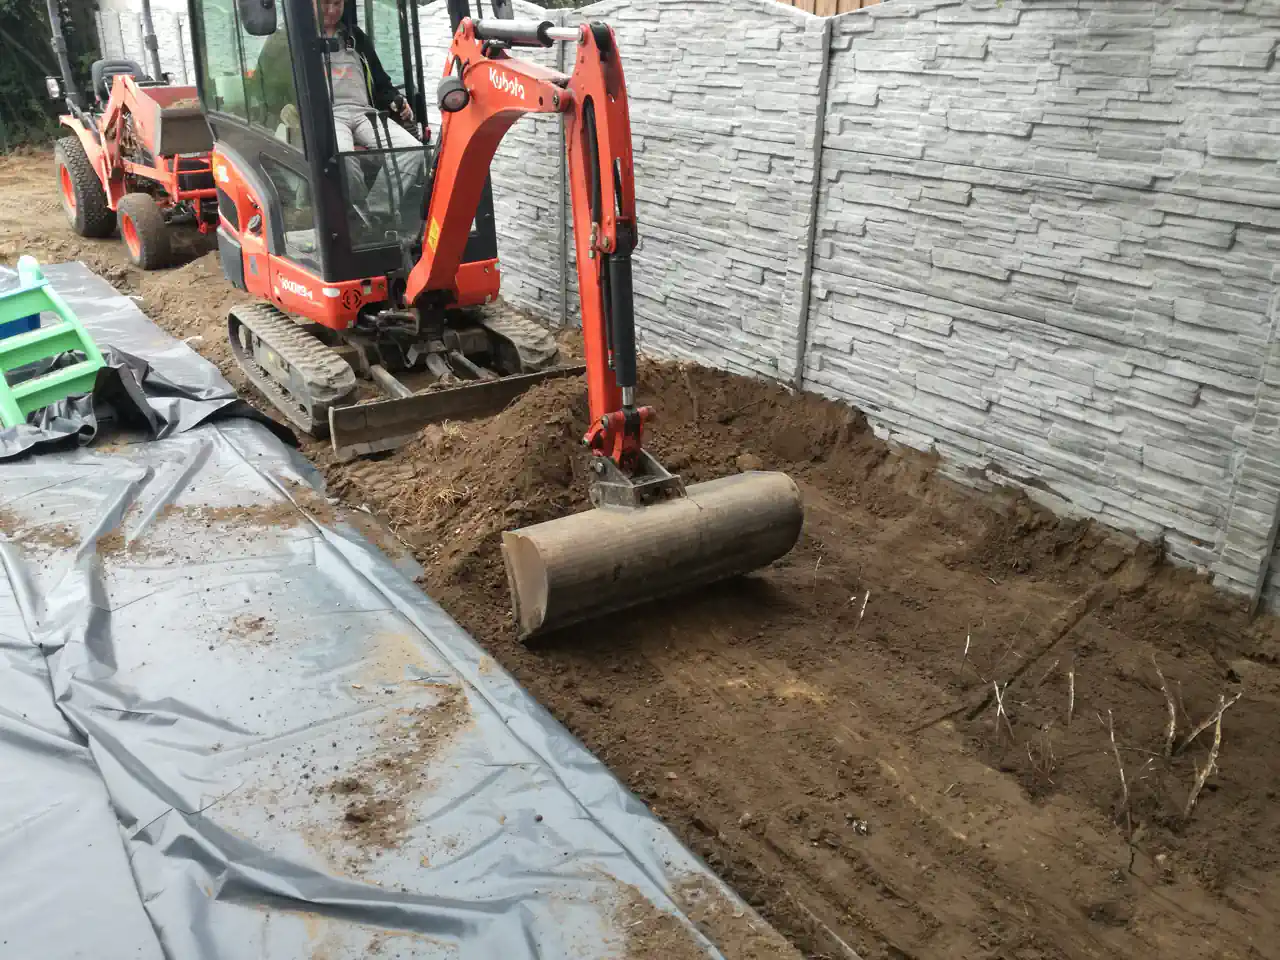
Several very important notes:
- Before starting work, secure the terrain against contamination or damage. In hardened places such as paving stones, it's worth using protective film to prevent contamination. If heavy machinery use is planned, laying plates or plywood is recommended. This protects the surface from sinking and minimizes risk of substrate damage.
- Remember to constantly use previously prepared stakes and strings marking heights to control elevation. Check if heights are correct and if stakes haven't been moved.
- An experienced excavator operator can maintain 0.8-1.6 inch accuracy during work. If your excavator claims this is impossible – time to look for a better specialist! 😉
- After laying a new soil layer, terrain naturally settles; it shouldn't be compacted with heavy equipment. This can excessively compact soil and limit its water permeability. In this case, you have two options:
- Using a heavy roller – this isn't about a manual 220-pound roller, but a 1,100-2,200 pound machine that evenly compacts terrain without causing excessive compaction. Thanks to this, soil remains stable while maintaining appropriate water permeability.
- Natural settling – the best solution is to perform work 1-3 months earlier so soil can gradually settle naturally.
- Accelerated settling – if we need faster terrain stabilization, it's worth abundantly watering it, for example using an irrigation system. Water accelerates the settling process while not causing excessive soil compaction.
- Excavation for fence foundations, pergolas, or other structural elements should be made below ground frost level.
- Surface installation – if terrain has low bearing capacity, use a stabilizing layer, e.g., compacted aggregate, sand, gravel, or geotextile. This will strengthen the substrate, preventing settling and improving surface durability.
Garden soil parameters – what to pay attention to
Appropriate soil is essential for healthy plant growth, so soil quality is extremely important for the garden. When buying soil, it's worth paying attention to several key parameters:
- Soil pH: Should be adapted to the type of plants we intend to plant. Lawn and most plants prefer slightly acidic pH (around 6.0-6.5).
- Structure: Soil should be light and permeable, making it easier for roots to access water and nutrients.
- Nutrient content: Make sure soil contains sufficient humus and macro- and microelements needed for plant growth.
- Lack of contamination: It's important that soil is free from debris, stones, and trash.

Conclusions:
- Well-chosen garden soil supports plant development – ensures
- Before purchase, ask the seller about soil parameters – composition, pH, and nutrient content are crucial
- Use soil testing to assess its quality – analysis will provide soil composition information and help select appropriate fertilizers
Soil types – which to choose for garden
Choosing the appropriate soil type is crucial for soil quality in the garden and plant growth. Understanding different garden materials helps make informed decisions.
Fertile soil (humus) - Humus is the top soil layer essential for proper plant and lawn growth. Usually it's several inches thick. This is the most valuable soil layer, rich in humus and nutrients essential for plants.
Deeper layer soil - Comes from lower ground parts and contains less organic substances, so it's not directly suitable for plant cultivation. However, it's often used for terrain leveling and property elevation.

Conclusions
- Don't use foundation excavation soil as garden top layer – it's poor in nutrients and can hinder plant development
- Use excavation soil for terrain forming – suitable for property leveling and level shaping
- Don't buy excessive amounts of topsoil (humus) – an 8-inch layer is sufficient to provide plants with optimal growth conditions
- Appropriate measurements and site preparation reduce costs –
Tools useful for excavation work
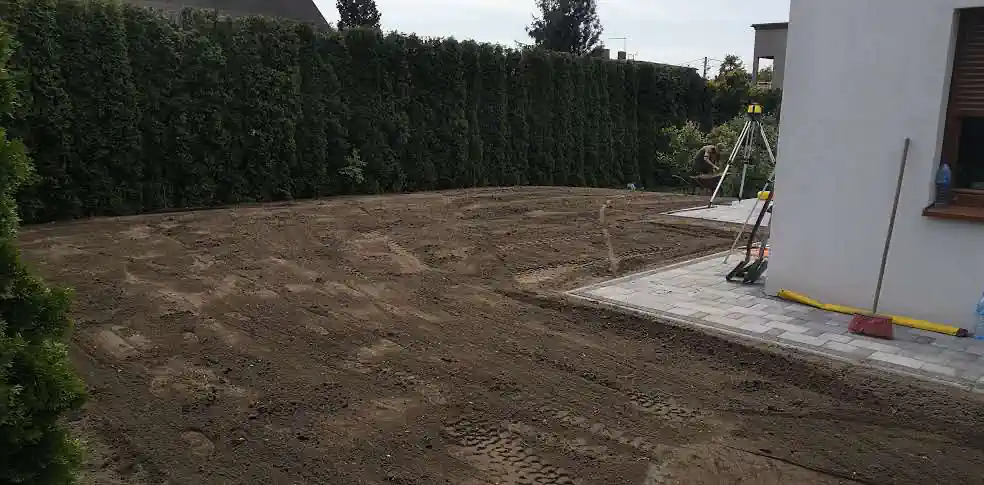
Measuring tools - Laser or optical level enables precise height and slope determination. String level, string, and stakes are a simple and cheaper solution allowing level control without specialized equipment.
Manual tools for physical work - Shovel and spade serve for manual soil removal and transport, and rakes help level surface and distribute soil. Wheelbarrow facilitates material transport, and garden roller allows light terrain compaction after leveling.
Heavy equipment - Excavator, excavator-loader, or mini excavator are essential for removing large amounts of soil and terrain shaping, enabling quick and effective excavation work execution. Consider various landscaping materials needed for the project.
Common problems during excavation work
During work execution, various problems may appear that significantly complicate garden project realization. The most common include:
- Inappropriate terrain slopes: Lack of proper inclination leads to water accumulation and drainage problems
- Wrong soil selection: Using inappropriate soil, too heavy or infertile, negatively affects plant growth
- Lack of plan: Improvisation during terrain leveling can lead to unevenness that's difficult to correct later
- Too little garden soil: Insufficient soil supplementation may mean plants won't have appropriate growth conditions
Avoiding these problems requires appropriate planning and adapting preparatory work to site specifics. Common garden design mistakes can be prevented with proper planning. It's worth consulting specialists so all stages are conducted properly.
Transform your outdoor space with professional design
Creating a beautiful, functional garden starts with proper excavation and soil preparation. Expert planning ensures optimal drainage, healthy plant growth, and long-lasting landscape features.

Ready to bring your vision to life? Get a professional garden design consultation and discover how expert planning can bring your landscaping vision to life.

Frequently asked questions
What are excavation works and what do they include?
Excavation works are all tasks related to preparing and shaping soil for various types of earth structures, underground installations, or residential gardens. This includes manual and mechanical excavations, terrain leveling, and slope securing. Technical garden plans help ensure proper execution of these works.
What types of excavations do we distinguish in construction and what are their applications?
Construction and excavation types are divided into several basic categories: wide-area excavations (covering large surfaces for parking lots, warehouses, underground tanks), narrow excavations (smaller width for water, sewer, power cables, or pipelines), foundation excavations (for residential and commercial buildings), vertical wall excavations (in limited space areas), and temporary construction excavations (for specific work duration). Garden utility installation often requires these specialized excavation techniques.
How much soil is needed for a garden?
To calculate needed soil amount, first measure garden surface area and determine desired soil layer thickness. Typically, for lawn or flower beds, a soil layer 4-8 inches thick is recommended. Then use our garden cost calculator to precisely calculate how much soil to order.
What equipment is needed for comprehensive excavation work?
Excavator, mini excavator, loader, bulldozer, roller, compactor, laser level, and excavation formwork for deep or unstable soil conditions. Garden electrical planning may also require specialized equipment for utility installations.
When should soil reinforcement or formwork be used in excavations?
When excavation exceeds 5 feet depth, soil is unstable, or there's risk of wall collapse, especially in trenching projects and areas with high groundwater levels. Professional landscaping contractor guidance is essential for these situations.
How much does excavation cost per yard and what affects pricing?
Excavation costs range from $3-8 per cubic yard for utility trenches and $5-15 per cubic yard for foundation excavations. Price depends on soil type, excavation depth, site conditions, and equipment used.
What are the main challenges in garden excavation projects?
Main challenges include dealing with different soil types, managing proper drainage slopes, handling utility lines, weather conditions affecting soil stability, and ensuring proper soil compaction for long-term stability. Following a comprehensive garden design guide helps address these challenges effectively.
How do you calculate soil volume for excavation projects?
Measure length, width, and depth of excavation area. For rectangular areas: Volume = Length × Width × Depth. For irregular shapes, use grid method or cross-section calculations. Always account for soil swell factor (typically 20-30% volume increase when excavated). Professional landscape architecture services can provide precise calculations for complex projects.
What safety measures are required during excavation work?
Key safety measures include proper slope angles (typically 1:1 ratio for depths over 5 feet), utility marking before digging, soil stability assessment, adequate drainage to prevent water accumulation, and proper equipment operation training. Ask the right contractor questions to ensure safety compliance.
How long should soil settle before proceeding with landscaping?
Newly placed soil should settle for 1-3 months naturally, or this process can be accelerated with regular watering. Avoid heavy compaction as it reduces soil permeability and can harm future plant growth. Understanding when to plant your garden helps coordinate timing with soil settling. Consider using mulch for soil protection during the settling period.

Wojciech Kazimierowicz – Author of the Article
Co-owner of Wytwórnia Zieleni and an expert in garden design and landscaping with over 13 years of experience. He specializes in creating modern, functional green spaces tailored to the budget and needs of homeowners.

Find Out How Much Your Garden Design Will Cost!
Take a quick quiz and discover the estimated cost of a custom garden design tailored to your needs. No strings attached – it takes just 2 minutes!


Wytwórnia Zieleni | Garden Design
KRS 0001107384 NIP 6452587627 REGON 528715049 St. Strzelców Bytomskich 51/1 42-600 Tarnowskie Gory, Poland
Resources
© Wytwórnia Zieleni 2026


