Irrigation System Design: Professional Planning Guide
Projekt nawadniania ogrodu to plan rozmieszczenia zraszaczy, sekcji, rur, elektrozaworów i sterowania, dopasowany do kształtu działki oraz parametrów źródła wody. Dobrze wykonany projekt pozwala uniknąć błędów, ogranicza zużycie wody i ułatwia samodzielny montaż instalacji.
TL;DR
- Projekt nawadniania zaczyna się od zebrania danych o źródle wody, sterowniku i czujniku deszczu.
- Rozmieszczenie zraszaczy powinno zapewnić pokrycie trawnika przez co najmniej dwa zraszacze.
- Podział na sekcje zależy od wydatku wody, nasłonecznienia oraz kształtu ogrodu.
- Projekt musi uwzględniać lokalizację skrzynek elektrozaworowych, przebieg rur i przewody sterujące.
- Finalnym efektem projektu jest kompletna tabela z długościami rur oraz gotowa lista zakupów.
Published
07 February 2026
Share this article


 Copied
TOC
- How to Design a Garden Irrigation System?
- Do You Need an Irrigation System Design?
- Step 1: Design Survey - Information Gathering
- Step 2: Design Preparation
- Step 3: Sprinkler Placement Drawing
- Step 4: Sprinkler Selection and Zone Division
- Step 5: Adding Key Elements to Design
- Step 6: Valve Box Placement in Design
- Step 7: Pipe Routing from Boxes to Sprinkler Zones
- Step 8: Pipe Supply to Drip Irrigation Zones
- Step 9: Marking Remaining Pipes and Elements on Design
- Step 10: Electrical Wire Routing in Irrigation System
- Step 11: Irrigation Table Completion and Design Element Measurements
- Shopping List - Design Finalization
- Summary
- Ready Design - What's Next?
- FAQ
How to Design a Garden Irrigation System?
In this comprehensive article, we'll show you step by step how to design garden irrigation, considering all essential elements. Effective garden irrigation systems are key to a healthy and beautiful environment around your home. A well-designed automatic irrigation system saves time, water, and energy while supporting plant development.

Do You Need an Irrigation System Design?
Absolutely YES! Creating an irrigation system design provides significant advantages. It allows proper planning, execution, and cost savings by avoiding unnecessary mistakes and expenses. Professional landscape design services always begin with comprehensive irrigation planning to ensure optimal water distribution.
- This comprehensive guide will help you create a complete automatic garden irrigation design step by step.
- To execute the design, you don't need advanced tools like CAD software - paper, pencil, ruler, and compass are sufficient.
- We base our approach on proven solutions, utilizing Hunter MP Rotator sprinklers that ensure precise watering, wind resistance, and forgive design errors.
- To simplify your work, we provide an irrigation design calculator that helps create a complete design and prepare a detailed shopping list. For professional results, consider consulting with a landscape architecture company to validate your design.
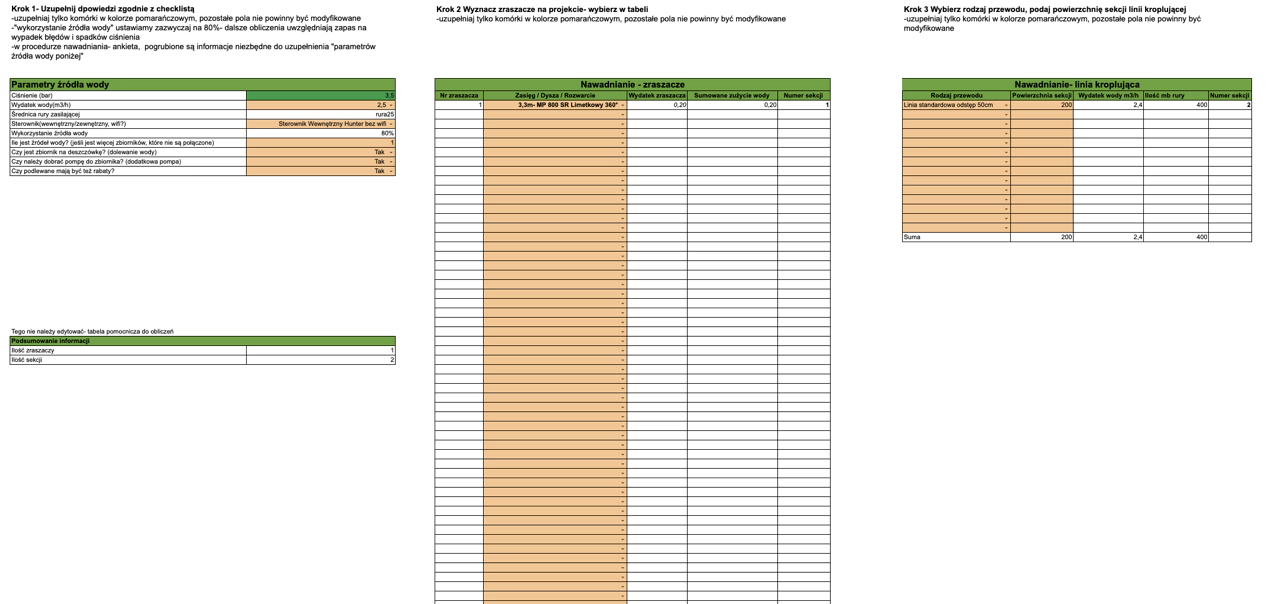
Step 1: Design Survey - Information Gathering
When planning a garden irrigation system, answer several key questions regarding technical conditions and garden needs. Below you'll find a detailed list of topics that help design an effective irrigation system.
Water Source for Irrigation Supply
The first step necessary for automatic irrigation design is determining what water source will supply the system. Use our water pressure gauge guide to accurately measure system parameters. Options include:
Mains Water:
- Where is the source located (e.g., faucet, pipe from house)?
- What are the water source parameters (How to measure water source parameters?)
- Is there a sub-meter for the garden? (worth installing to avoid double water charges)
- What flow capacity does the sub-meter have? Is it possible to install a larger sub-meter if it significantly restricts flow?
Rainwater Tank: For comprehensive rainwater harvesting planning, see our rainwater collection system guide:
- Where is it located?
- Is the tank equipped with a pump? What are its parameters (water output, pressure)?
- What is tank capacity? Does it have overflow to drainage infiltration?
- If there's more than one tank, do tanks have connections? (do they function as one tank?)
Deep or Shallow Well: For detailed well integration planning, explore our well water irrigation guide:
- Where on the property is it located?
- What parameters does the well have, is there sufficient water quantity?
- Is there a pump in the well? What are its parameters (model, water output, pressure)?
Irrigation Controller
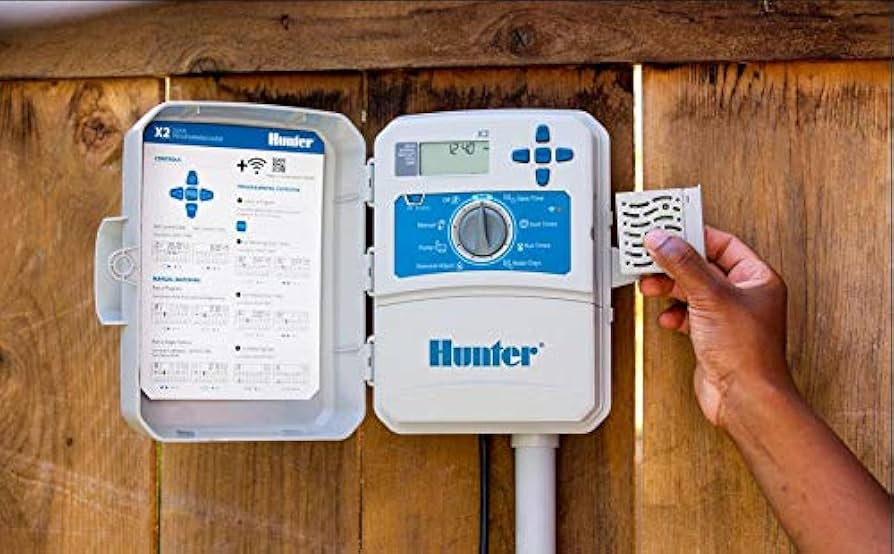
The irrigation controller is a key element of the automatic sprinkler system. Answer the following questions:
Where can it be installed?
- Inside the building
- Outside (e.g., on building facade)
- Other location (please specify)
Also consider:
- Should the controller have Wi-Fi module? (Enables remote system control via app - check if there's signal coverage at installation location)
- Is there power access at installation location (electrical outlet)?
- Can cables be easily routed from this location without major construction work?
Rain Sensor
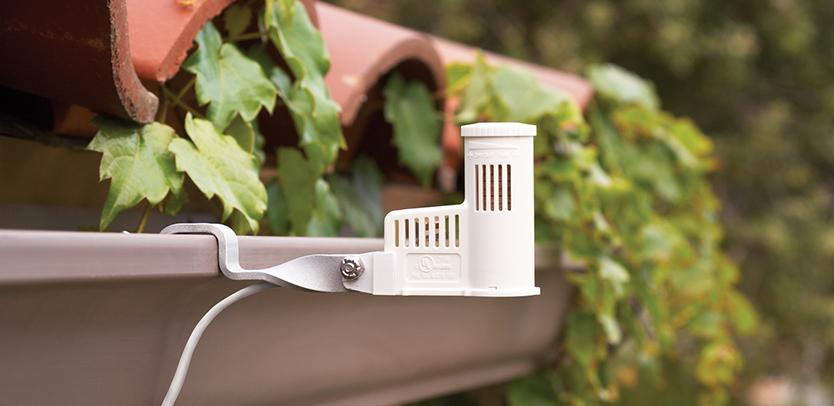
A rain sensor allows automatic irrigation suspension during precipitation. When selecting and installing, consider:
Installation Location:
- Near controller or valve box (ease of cable routing)
- Best building location, fence, gazebo, or outbuildings
Location Conditions:
- Sensor should be exposed (free access to precipitation)
- Should be in shade to avoid direct sunlight
- Must be easily accessible for maintenance
- Cable routing to sensor is necessary
Answering these questions enables designing an irrigation system that meets all your garden's needs. If you don't know answers to some questions, consult with a professional - they'll help assess conditions and adapt the design to your environment. For comprehensive planning support, explore our irrigation water supply planning guide.
Step 2: Design Preparation
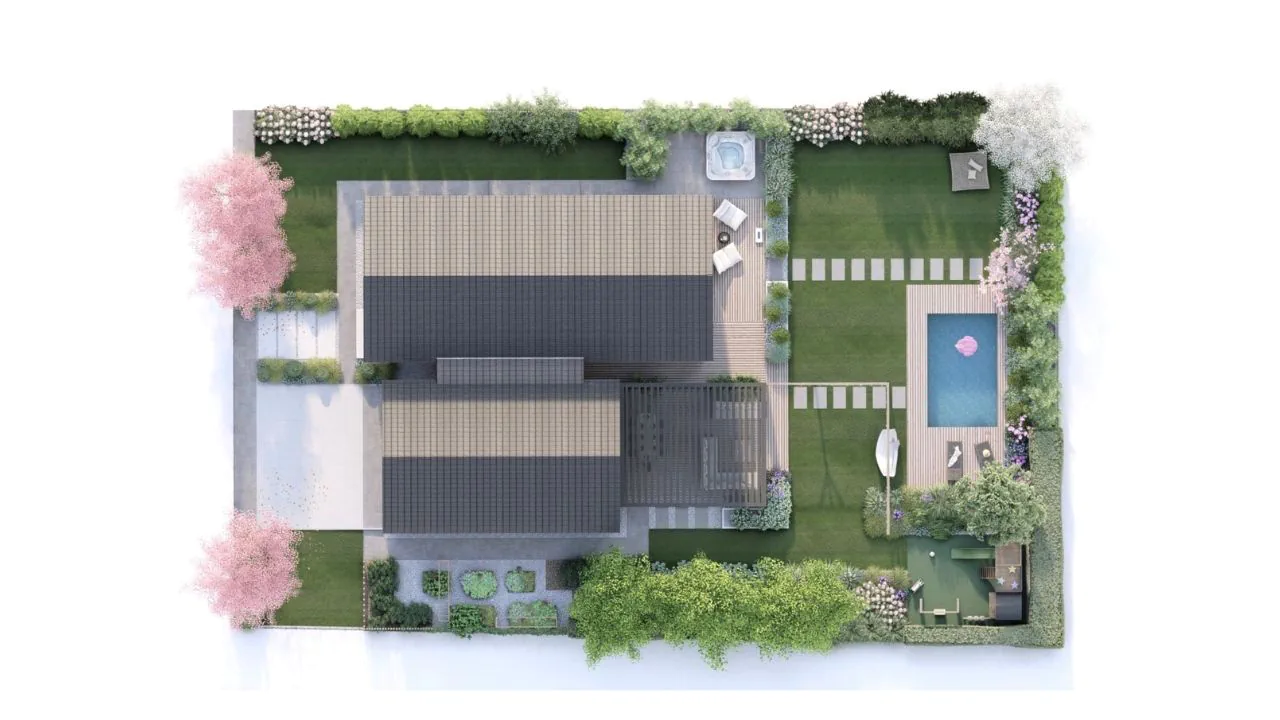
Obtain an accurate base plan, such as a surveyor's map with buildings, surfaces, and other garden elements. If you don't have a development plan or garden concept yet, check our garden design guide for comprehensive planning. Executing irrigation on a garden without a plan will cause additional costs and future problems.
Recreate the garden plan on paper or simple graphics software (e.g., Microsoft Paint, Canva). Use a ruler to reproduce scale and mark key elements such as lawn boundaries, paths, buildings, and other obstacles.
Step 3: Sprinkler Placement Drawing
Divide Lawn into Smaller Sections
You'll design sprinkler placement most easily by dividing lawn into squares and rectangles (or other shapes matching your garden forms). This makes it easier to determine sprinkler locations, ensuring even coverage across the entire surface. For comprehensive coverage planning in landscaped areas, consider how garden beds will integrate with your irrigation zones.
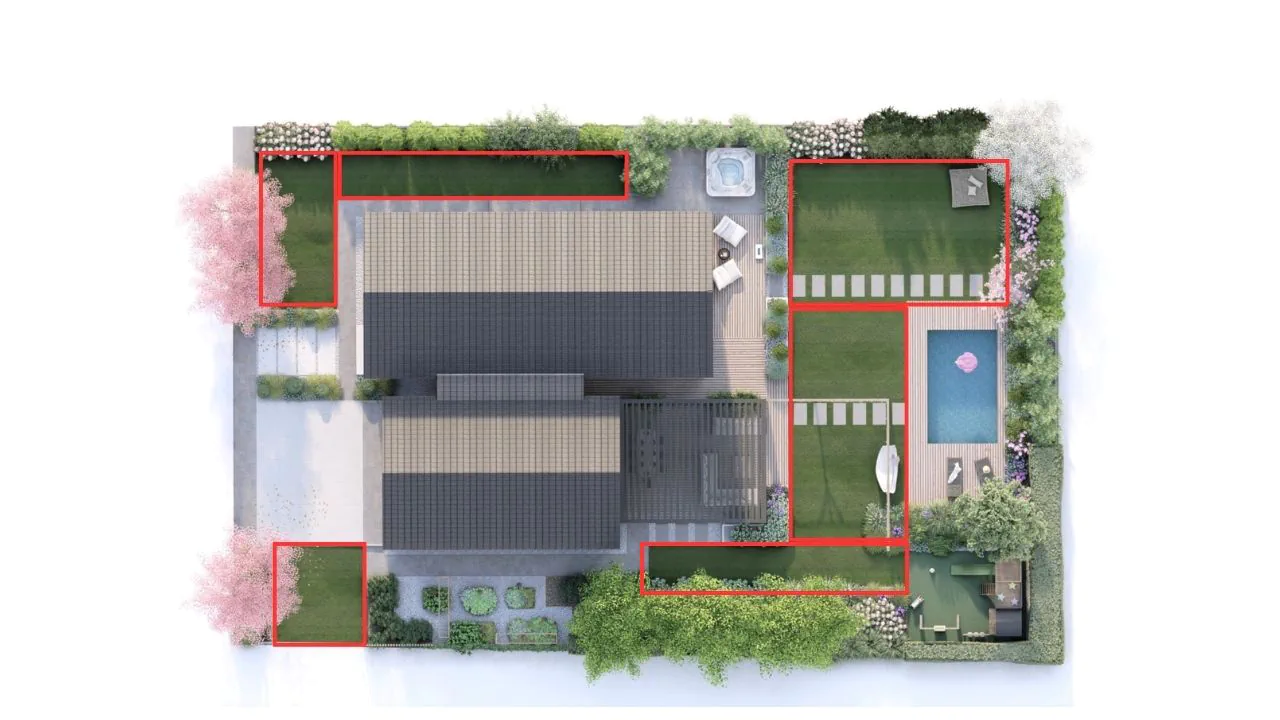
Place Sprinklers on Designated Area Surfaces
- Position sprinklers at corners of designated surfaces: Mark sprinkler locations and draw sprinkler ranges using compass (circles/semicircles, etc.). Each sprinkler should cover space at least 20-30 cm (8-12 inches) beyond lawn edges (considering real sprinkler operation and that range can always be reduced to 25%).
- Add sprinklers between corners: Measure distances between already marked sprinklers, insert additional sprinklers at equal intervals. Their ranges should cover space between corner sprinklers. Every lawn location should be irrigated by at least two sprinklers.
- Center lawn sprinklers: If after placing corner and intermediate sprinklers there are uncovered areas in lawn center, add sprinklers in those areas.
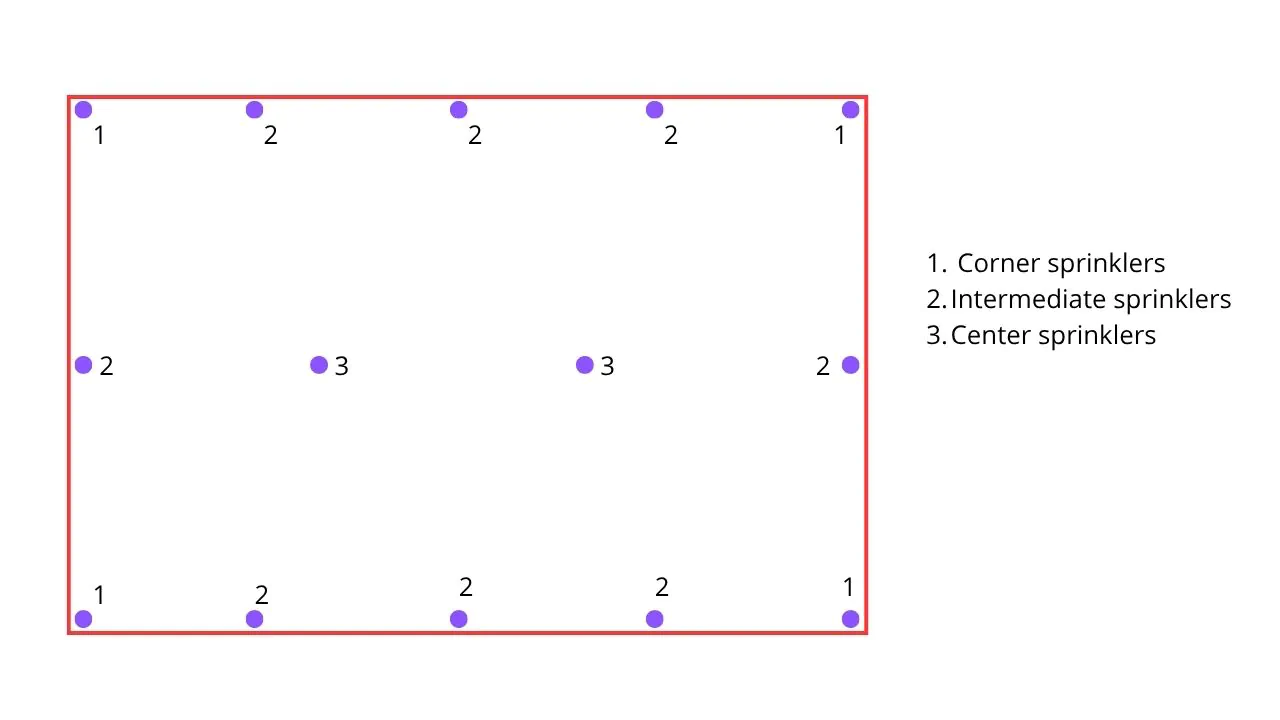
Coverage Verification
- After placing all sprinklers, verify that the entire lawn is covered by water from at least two sources. Mark any corrections on the plan if some areas remain uncovered.
- Complete sprinkler coverage map showing overlapping spray patterns ensuring uniform lawn irrigation without dry spots
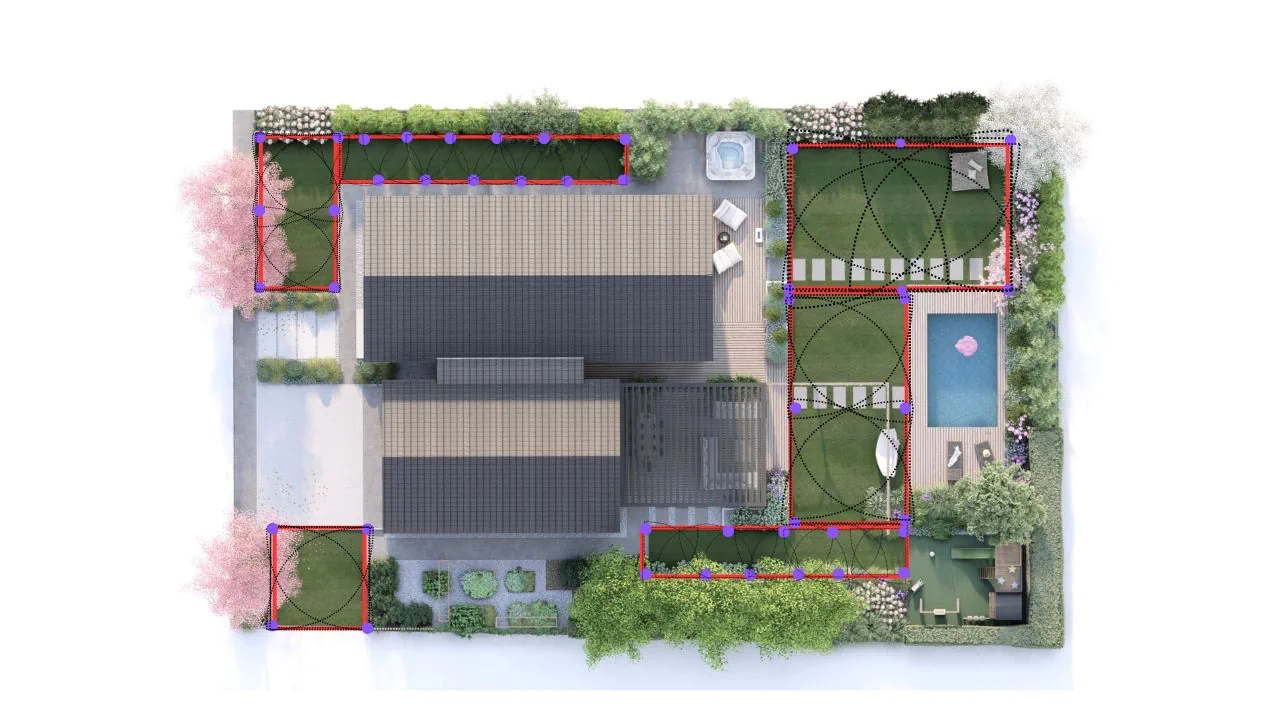
Tips:
- When drawing sprinkler ranges, remember to use different radii depending on actual range of available sprinklers
- Include in sprinkler range that it must spray water 20-30 cm (8-12 inches) beyond lawn area (easy to reduce range with oversized nozzles)
- If you have problems with even placement, divide lawn into smaller sections and design each separately
- Accept maximum sprinkler radius R = 10.7 m (35 feet) (range provided by MP Rotator 3500 sprinkler)
- Finally, record needed sprinkler list with their ranges to easier select appropriate equipment
Step 4: Sprinkler Selection and Zone Division
After initial sprinkler placement on lawn, it's time to select appropriate nozzles. Below you'll find step-by-step instructions to help execute this stage.
- Open the link to Garden Irrigation Design Calculator.
- In the upper left screen corner, click "File".
- Then click "Make a copy".
- Save the Calculator to your drive - now you can edit and complete it step by step.
Need calculator in English for free ? Feel free to write us an email biuro@wytwornia-zieleni.pl
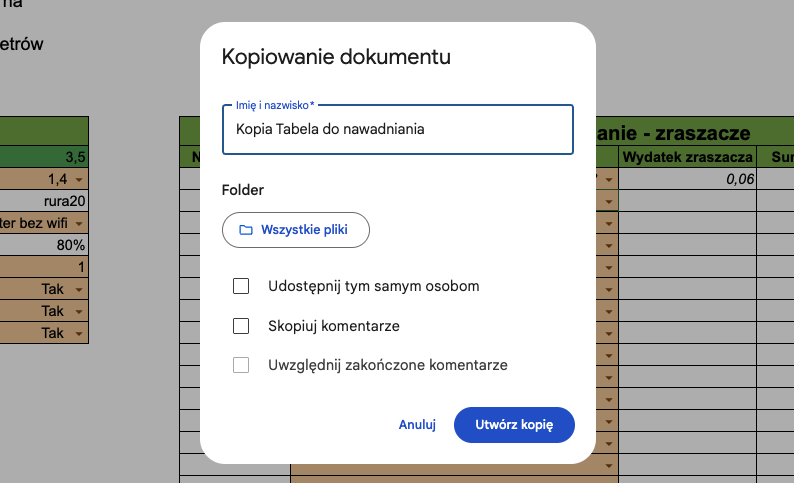
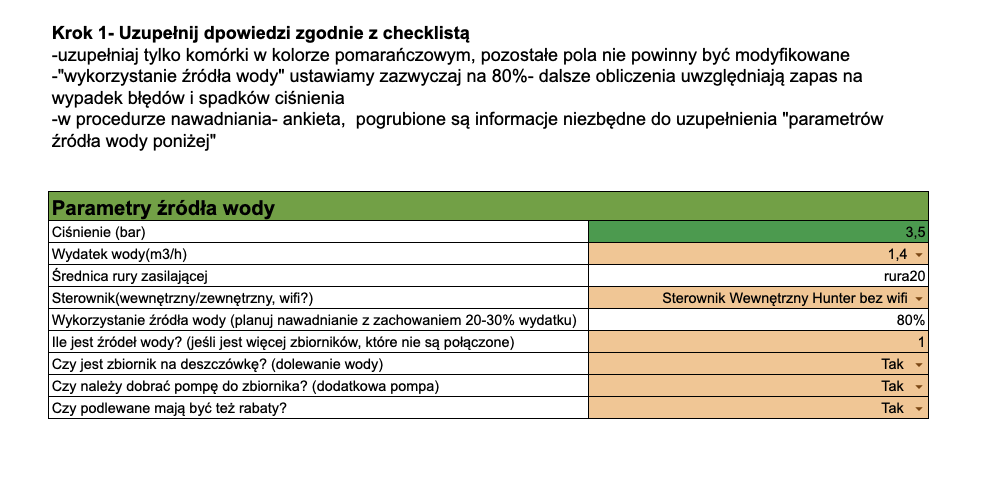
Water Source Parameter Information Completion
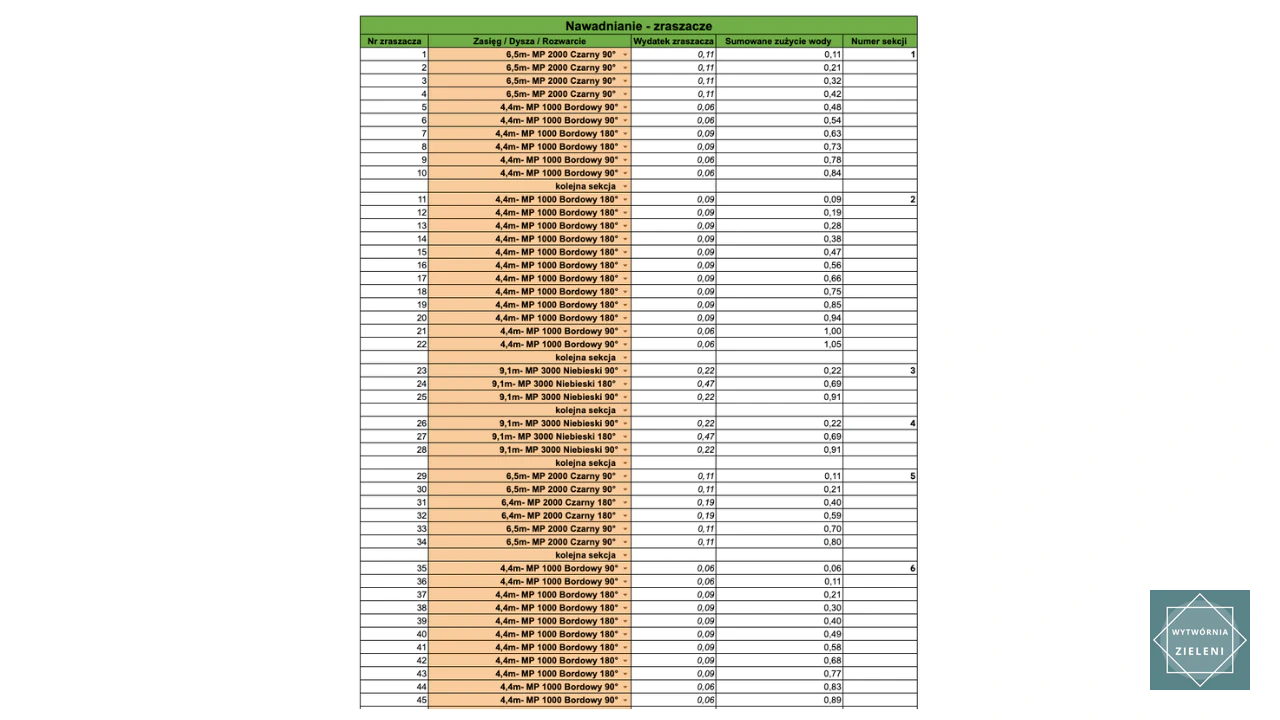
Complete information in the first table step. This data automatically selects appropriate pipes for the entire system and indicates when sprinkler quantity per zone is too large (exceeds water output). Use our water usage calculator to estimate long-term operational costs.
Sprinkler Selection
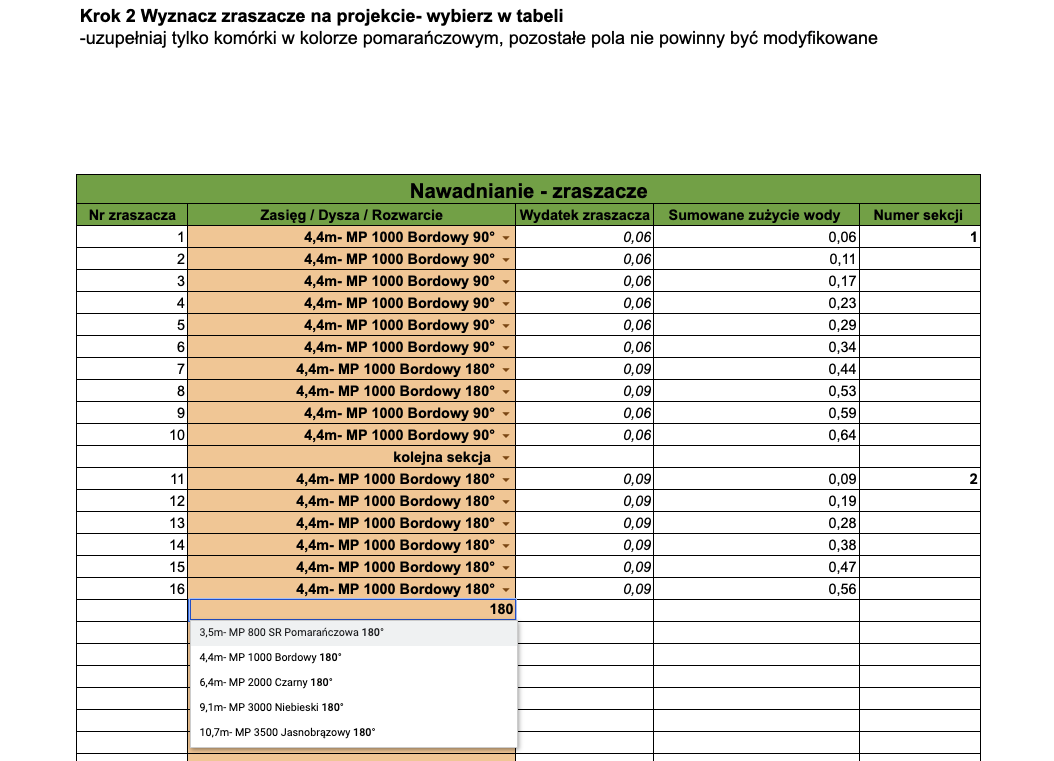
We now proceed to selecting appropriate sprinklers for zones. The table allows quick selection of nozzles from available sizes and ranges. It also sums water outputs, indicates when zones exceed water source capabilities, and automatically inserts appropriate nozzles in a shopping list.
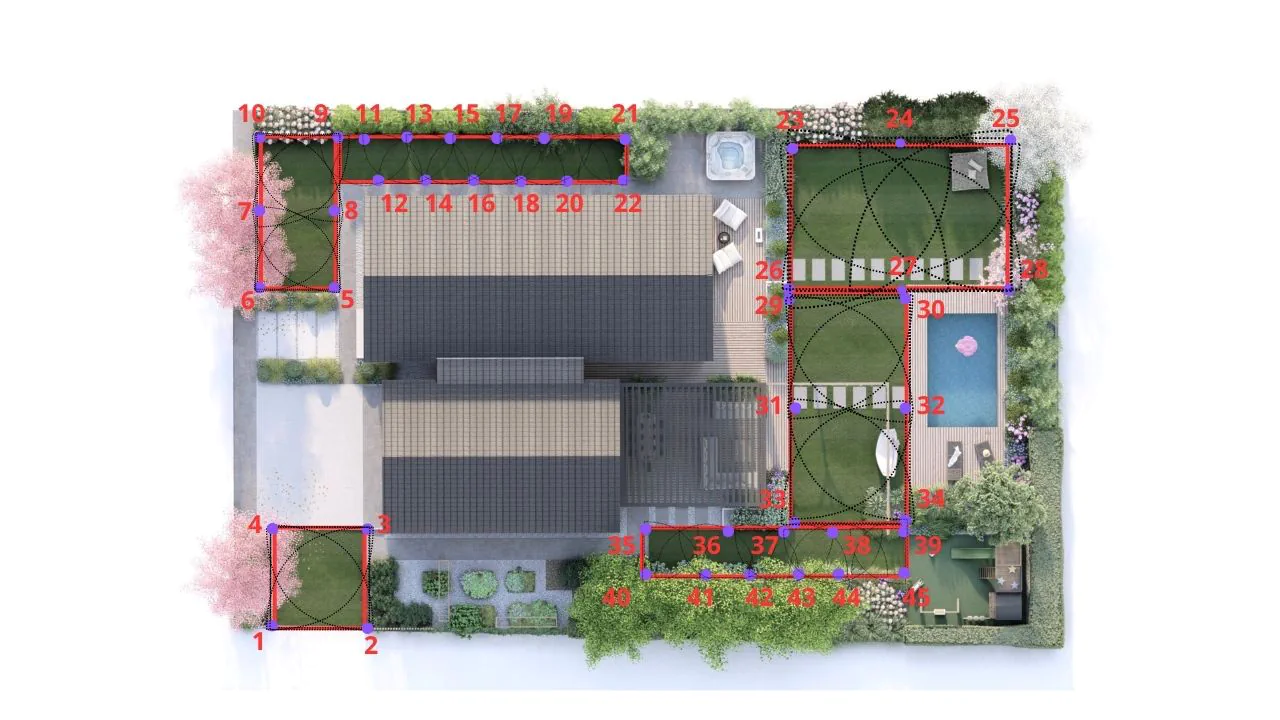
- Number sprinklers in the first area you'll develop.
- In irrigation table: enter sprinkler operating angle (e.g., 90° for corners), then select sprinkler range from dropdown list according to plan.
- Remember that table range must equal or exceed sprinkler range on design (sprinkler range can be reduced 25% through adjustment).
- Repeat this process for each sprinkler in the given zone until you include all in the selected lawn section.
When you exceed available water output (cell turns red) or want to create a new zone, select "next zone" from dropdown list.
Zone Creation
While numbering sprinklers and selecting appropriate ranges, you'll eventually need to divide irrigation into appropriate zones. Main factors to consider when dividing irrigation into zones:
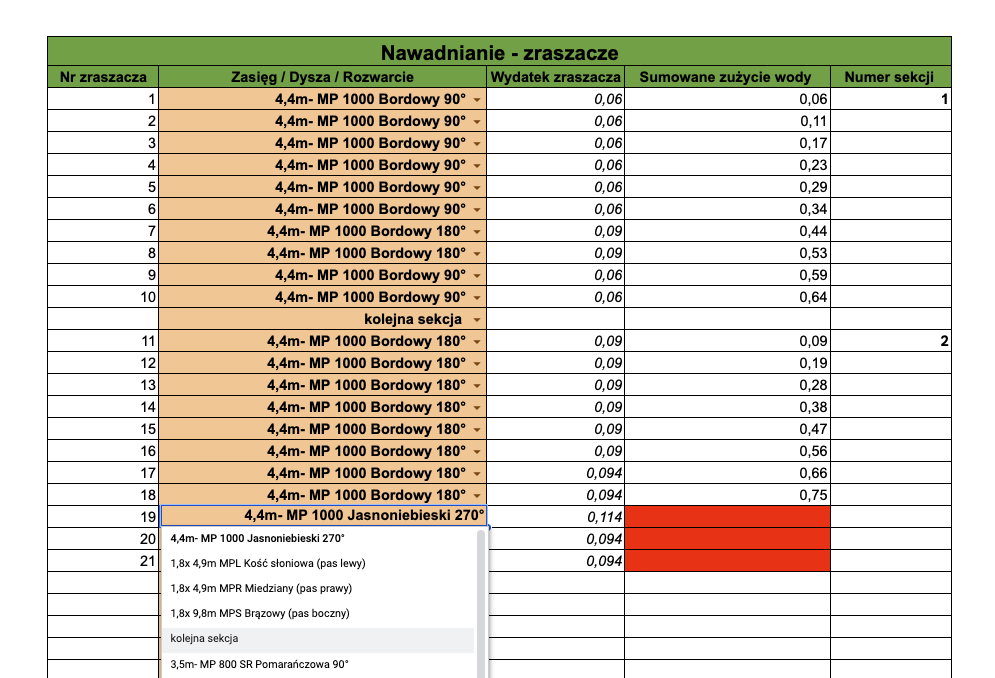
- Water Output - calculator shows individual sprinkler water output and water consumption at last sprinkler in zone. When you exceed output, cell turns red.
- Cardinal Directions and Shading - separate sunny and shaded areas.
- Lawn Shape - divide into logical, easy-to-manage sections.
- Other Factors - e.g., terrain differences, property slope, etc.
When planning fence line landscaping, ensure irrigation zones accommodate future plant growth and water requirements.
When a zone exceeds water output limit, click "next zone" in table. This starts a new sprinkler group. Creating a single zone for entire lawn may be an error, even if water output allows, as it doesn't consider all above factors.
Process Repetition
- Continue selecting sprinklers and dividing lawn into zones until each sprinkler is assigned to appropriate zone.
- Check that each zone operates within acceptable water output parameters and optimal terrain coverage.
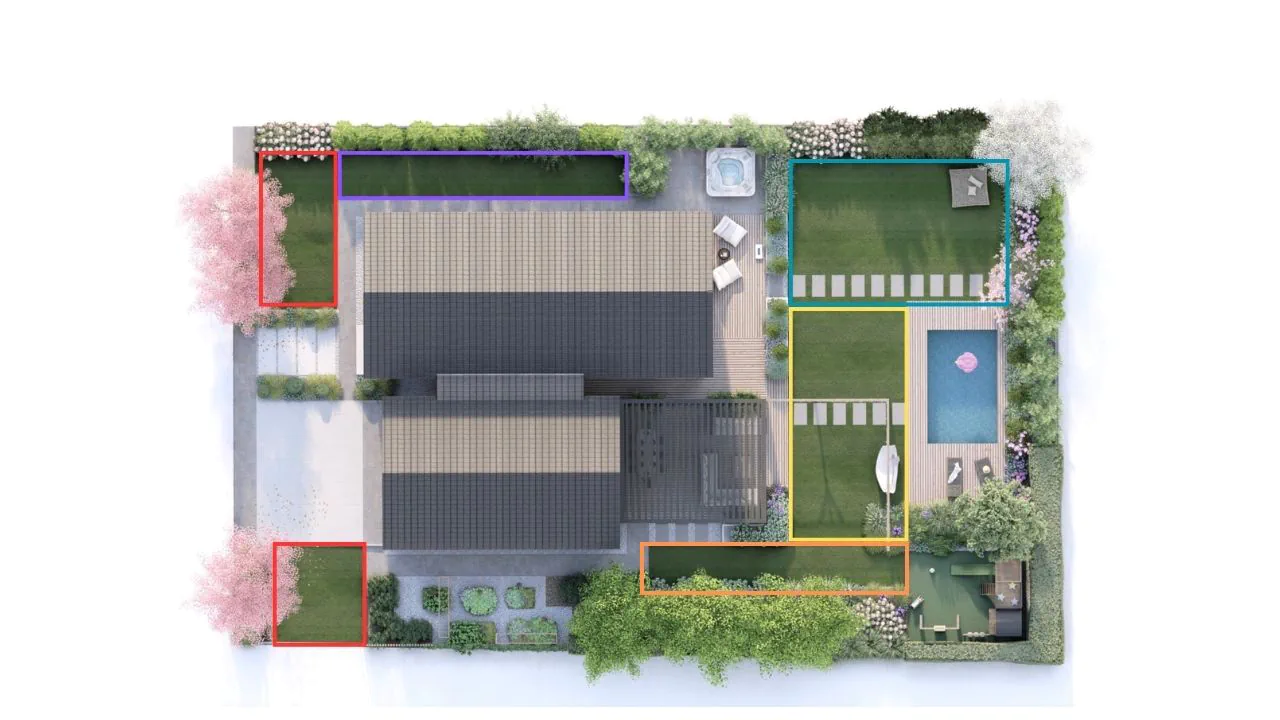
Your design will be divided into well-organized zones with precisely selected sprinklers. This division enables effective irrigation of the entire garden, minimizing water waste and ensuring even watering.
Step 5: Adding Key Elements to Design
The next step in irrigation system design is placing all necessary elements on the plan according to legend. This ensures proper placement and functionality.
Instructions:
- Place water source on design: Mark location from which water will be drawn for watering or tank refilling (e.g., faucet or outlet pipe from house)
- Mark well (if present): Indicate well location from which water will be drawn for tank refilling or direct irrigation
- Add tank: Mark tank location where pump will be installed. Ensure it's placed according to actual property location
- Place controller (irrigation computer): Mark controller location. Choose location near power source and easily accessible for installation and maintenance
- Mark rain sensor: Place sensor in exposed location, unobstructed by trees, buildings, or other obstacles
For accurate project cost estimation, use our landscape pricing calculator to budget for all system components.
Notes:
- If garden lacks well or tank, don't add these elements to design
- Each element should comply with legend markings to avoid mistakes during implementation

After completing this step, your design will contain all key elements necessary for proper irrigation system operation.
Step 6: Valve Box Placement in Design
Next stage involves marking valve box locations on design. Follow guidelines below to properly place these elements.
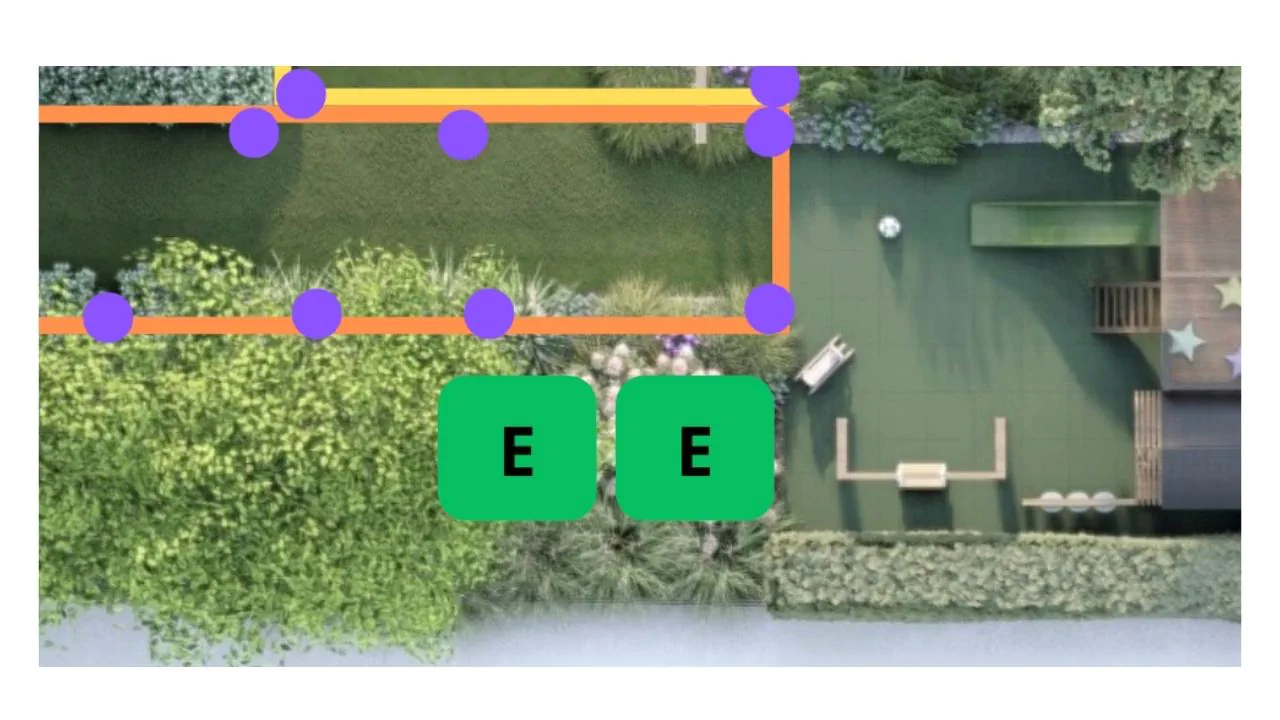
Instructions:
- Insert rectangle symbolizing valve box at appropriate design locations
- Choose appropriate location: boxes are best placed in garden beds if possible. Place near main water source or tank
- Consider real conditions: Areas marked on designs as box locations will remain free from plant installations, ensuring easy maintenance and service access

Notes:
- On design, you can mark boxes only schematically (box placement area) or 100% replicate their layout
- Note that boxes should be in easily accessible locations, preferably in plant beds
- Boxes can be camouflaged by covering lids with bark or decorative stone, or remain uncovered depending on garden owner preferences
- Placing valve boxes in lawn isn't an error as long as property owner doesn't object
- There are many ways to execute boxes and install elements. There's no single best solution. Valve quantity in one box can exceed 4-5 units, but this causes access difficulty and potential element replacement issues
After valve box placement, your design will be ready for precise zone division and further installation system planning.
Step 7: Pipe Routing from Boxes to Sprinkler Zones
Next step in irrigation system design is planning pipe routes carrying water from solenoid valves to sprinklers. Follow instructions below to properly draw main and lateral lines.
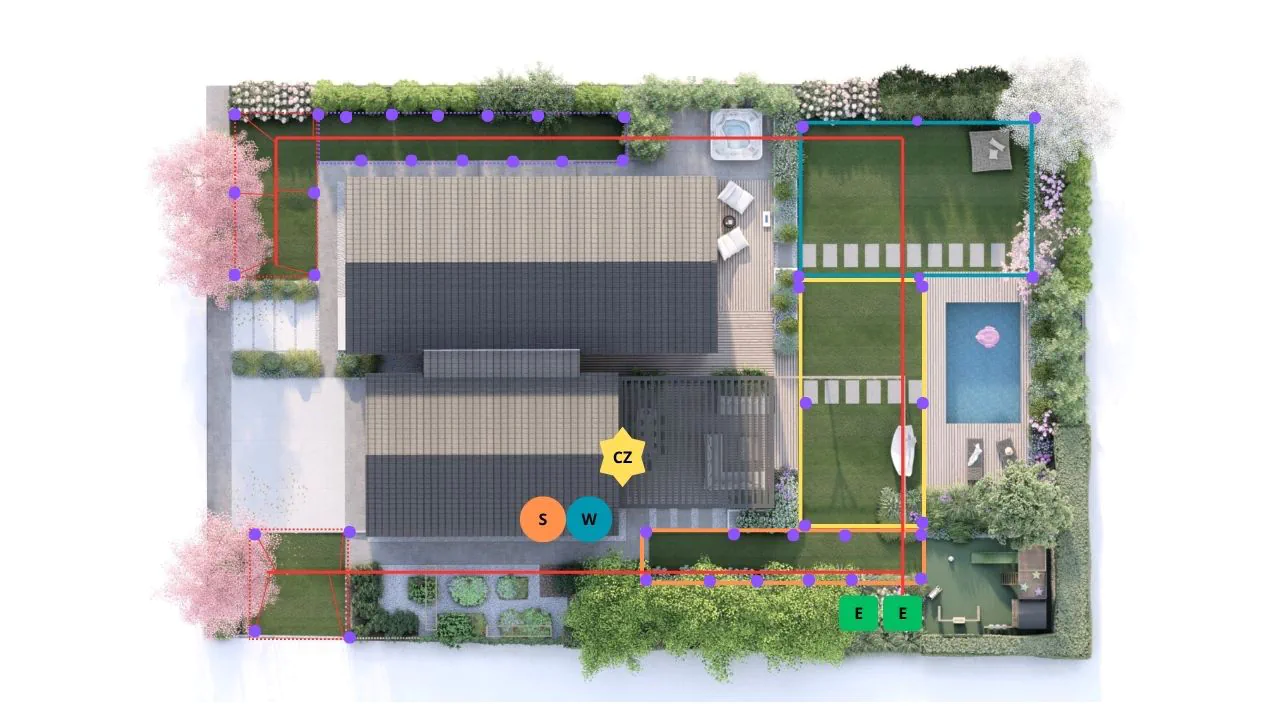
Main excavation trenching for irrigation pipes showing proper depth and routing through lawn areas
Main Pipe Line Drawing (Main Excavation)
Draw line leading to most distant zone(s): this is main line through which all pipes from solenoid valves to zones will be routed. Try routing main pipes in lawn areas - avoid beds or paths if possible (sometimes impossible). This minimizes collision risk with pipes when planting trees or executing paving/terraces. For comprehensive pipe sizing guidance, see our irrigation pipe sizing guide.
Zone 1: Main Pipe
Draw main pipe for zone with thick line: route it shortest possible way to second-to-last sprinkler in given zone. Mark location where reduction from main pipe to lateral pipe will be installed. Lateral pipes: from reduction location, draw thin lines of lateral pipes leading to each sprinkler. Try routing them shortest way at approximately 90° angle.
Zone 1 irrigation layout showing main pipe routing and lateral connections to individual sprinkler heads
Repetition for Subsequent Zones
Draw main pipe for given zone with thick line. Route it in same excavation as other main pipes (if possible). Add lateral pipes with thin lines to each zone sprinkler. Finally, sum all pipe lengths on design and complete them in table.
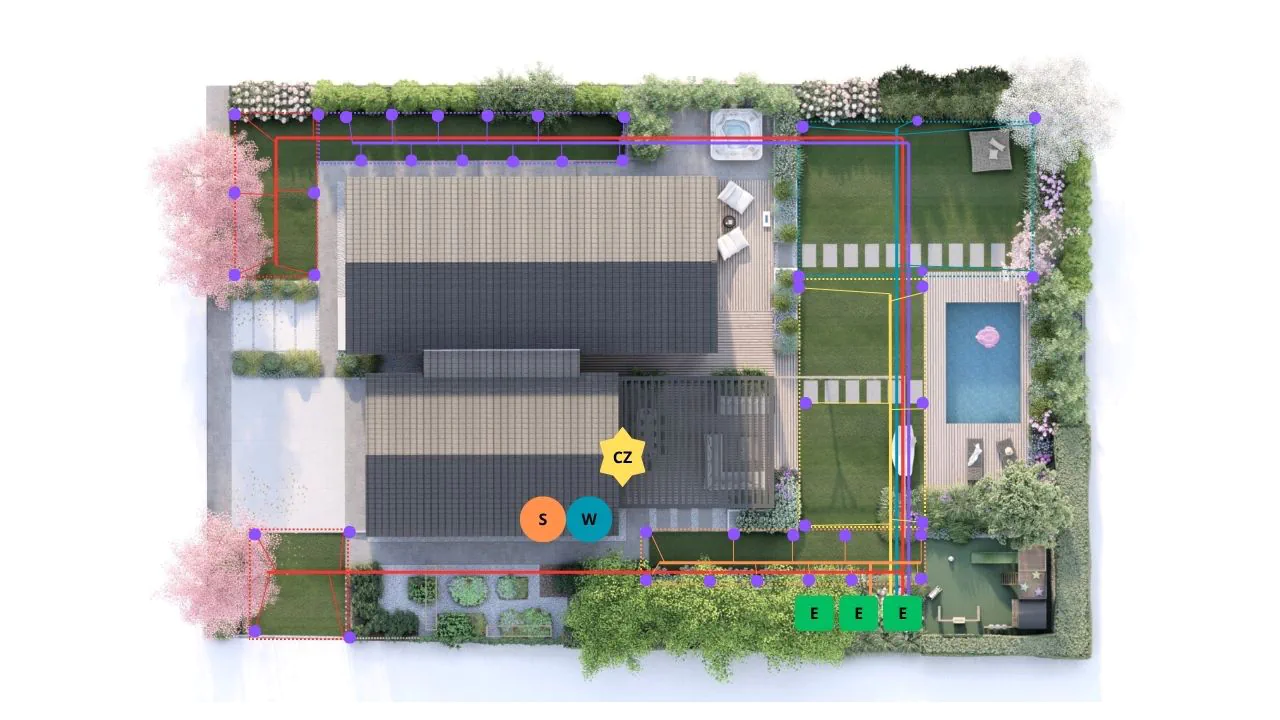
Notes:
- Route all main pipes in one excavation if terrain layout allows - this facilitates installation and limits earthwork
- Precise pipe marking on plan ensures design clarity and facilitates system implementation
- Main pipe excavation should be wider and deeper because they take much space. Deeper excavation guarantees pipes will be 25-35 cm (10-14 inches) underground
Thanks to this stage, your design will contain detailed pipe placement, enabling efficient installation and ensuring proper irrigation system operation.
Step 8: Pipe Supply to Drip Irrigation Zones
In next stage, you'll design drip irrigation zones, considering bed needs and efficient water use. Here's detailed instruction:
Bed Marking and Numbering
Garden bed layout plan showing zone divisions and numbering system for organized drip irrigation planning
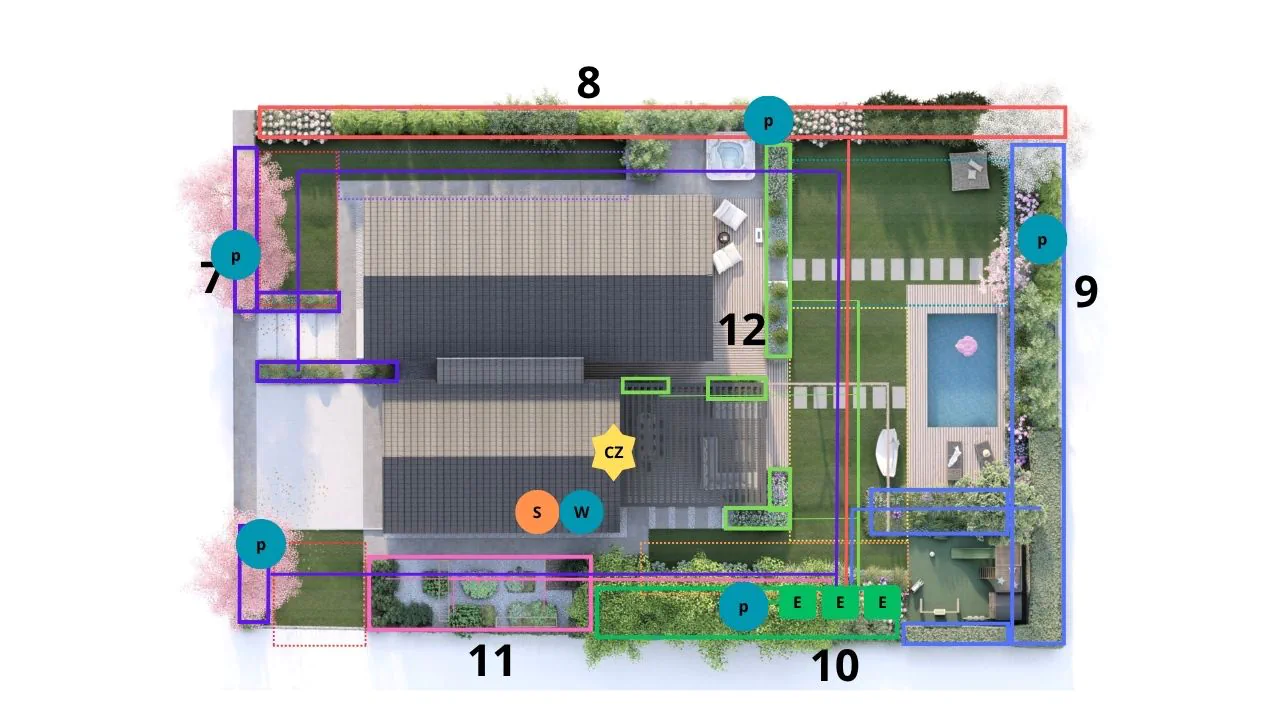
- Divide zones and color-code beds: consider sun exposure, cardinal directions, plant water requirements, terrain formation, etc.
- Bed zone numbering: Number each bed to easily connect it with appropriate irrigation zone.
- Bed surface area: Calculate each bed area and enter values in irrigation table (Step 3). Ensure water consumption in individual zones doesn't exceed output (table shows warning if limit exceeded).
- Zone division in garden showing logical grouping based on sun exposure, plant types, and water requirements
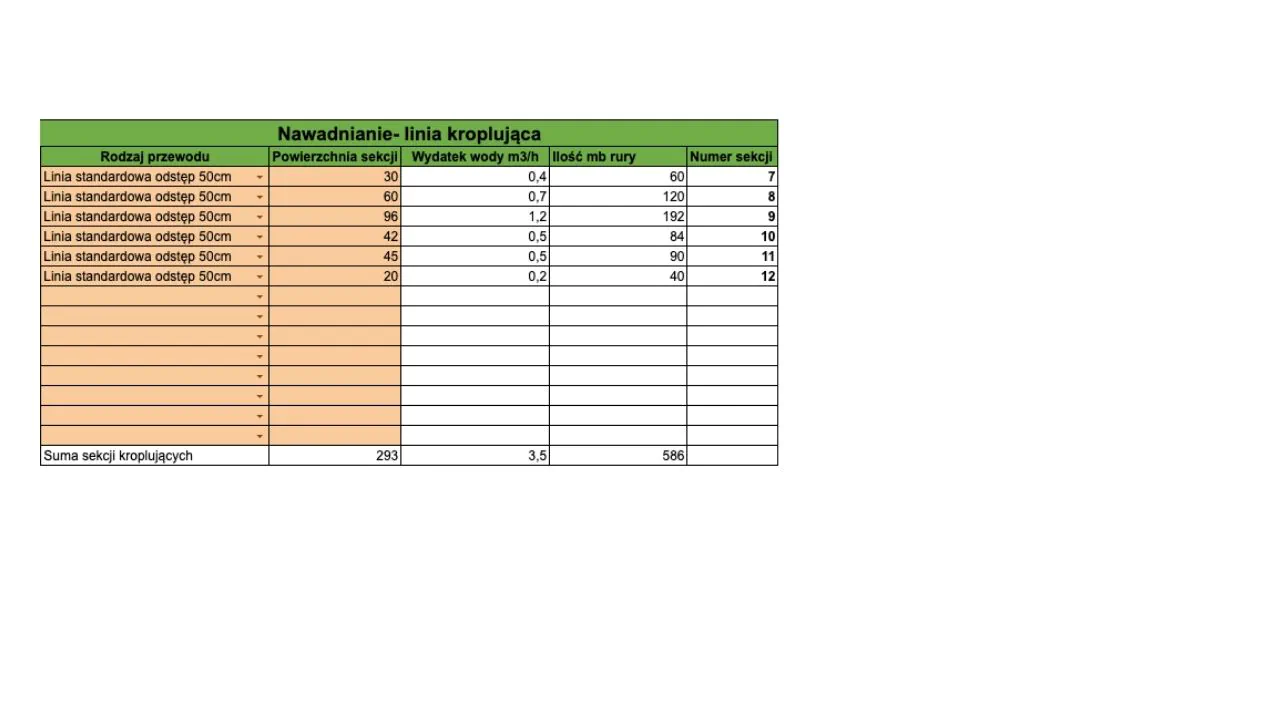
Pipe Supply to Drip Irrigation Zones
- Use existing excavations: Route main pipes for drip zones in same excavations as main pipes for sprinklers to minimize earthwork.
- Main pipe: Draw main pipe leading to given zone with thick line, according to shortest and most efficient route.
- Lateral pipes: From main pipe, distribute thin lines to each point in drip irrigation zone. Route them to encompass all beds, ensuring even irrigation. For comprehensive drip irrigation system planning, consider flow requirements and pressure distribution.
Pipe routing to garden beds showing main distribution lines and lateral connections for comprehensive drip irrigation coverage
Notes:
- In above example, for clarity we divided lawn irrigation and bed irrigation into two sheets. You can design everything on one sheet if you can readably include everything
- If zone exceeds allowable water output, divide it into at least two zones in drip irrigation table
- Planning one zone for entire garden area (even if water source allows) may cause problems. Some plants get too little water, others too much; proper zone division avoids or minimizes such problems
When designing irrigation for hedging plants, consider their mature size and seasonal water requirements.
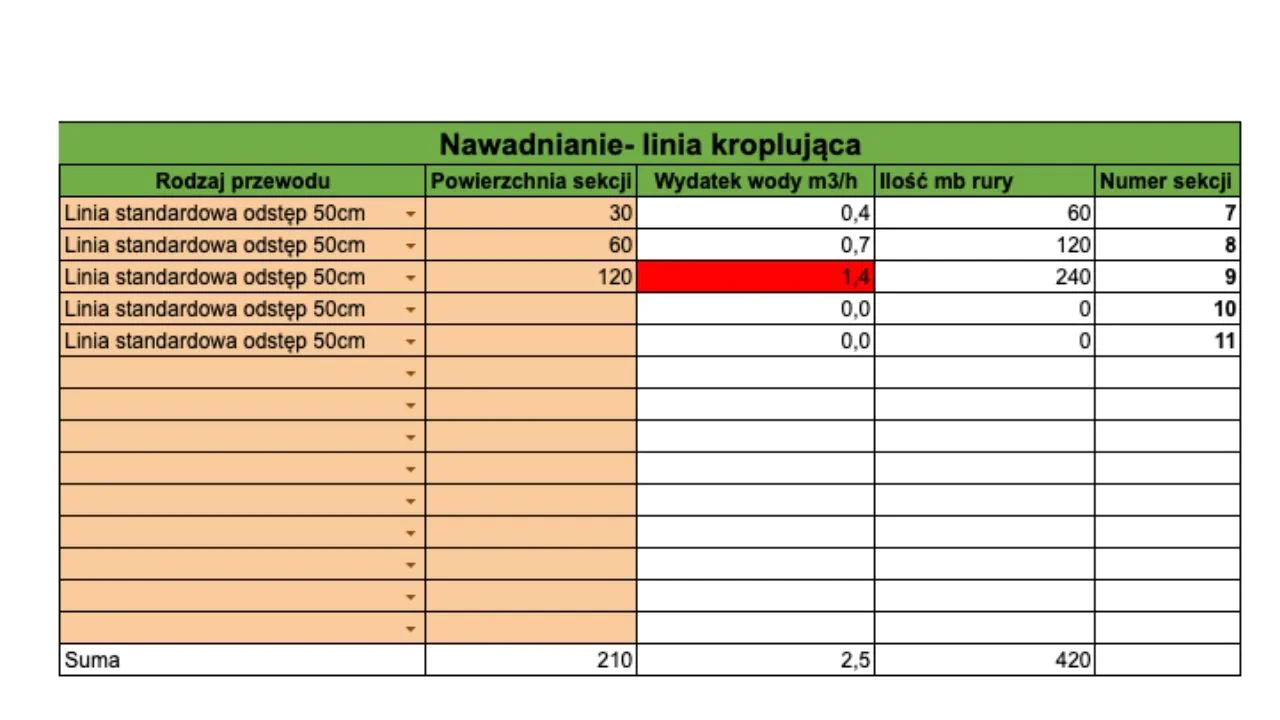
After executing this step, plan will contain detailed pipe placement for drip zones, adapted to bed requirements and garden conditions. This enables precise and efficient irrigation of plants with different needs.
Step 9: Marking Remaining Pipes and Elements on Design
Final step in design involves marking pipes and water outlets on plan, ensuring convenient water access in different garden areas. Follow guidelines below.
Tank Water Refilling
Draw line from water source (mains or well) to tank. Use thick line to mark main pipe carrying water to tank. Consider terrain conditions: Try routing pipes shortest way in locations easily accessible for earthwork.
Water Outlet Point Marking
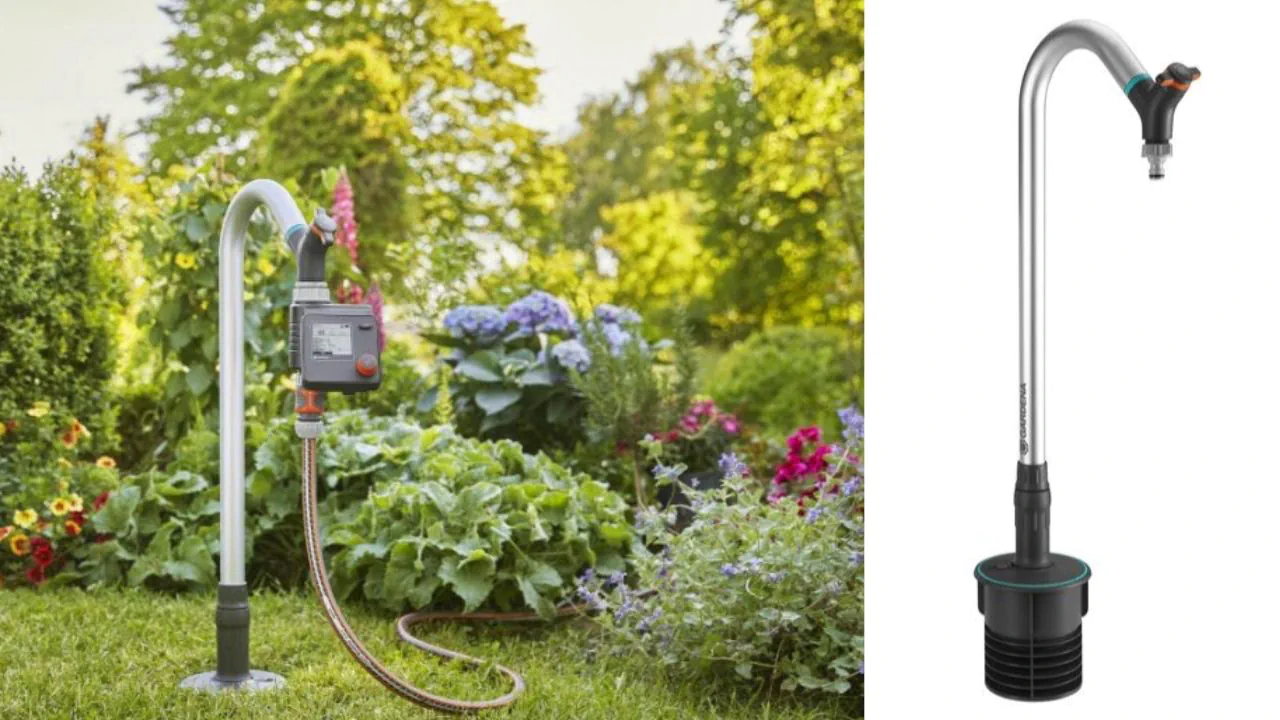
In garden, plan several water outlets that facilitate future garden use. Place water outlets on design. Consider below outlet locations:
- At property entrance, at rear house terrace
- In property corners
- In locations where water may be needed
For comprehensive cost planning including all components, use our soil calculator to estimate excavation requirements.
Final Notes
- Ensure pipe routes don't cross in locations difficult to implement (e.g., under hard-surface paths). Check that outlet placement is convenient and covers entire garden needs.
- Strategic water outlet placement showing multiple access points for comprehensive garden water coverage
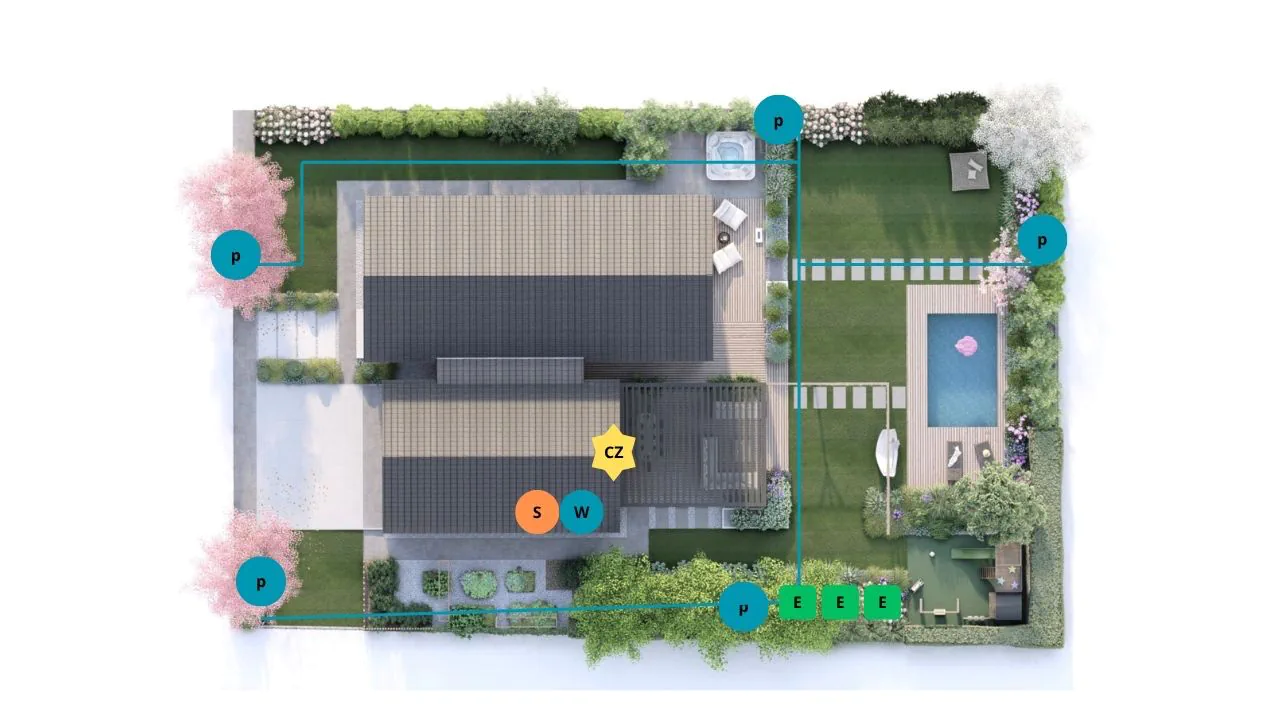
After marking all pipes and water outlets, your design will be complete. This ensures irrigation system functionality and convenient water access anywhere in garden.
Step 10: Electrical Wire Routing in Irrigation System
In final stage, you'll plan telecommunication wire placement, necessary for irrigation system control. Remember to include them in design according to guidelines below.
Telecommunication Wire
- Controller - valve box: Wire count = zone number + 1 (common wire). For example: if you have 4 zones, wire must have 5 conductors (4 zones + 1 common wire). Our irrigation calculator automatically selects wire conductor count (in shopping list).
- Controller - rain sensor: Rain sensor wire should have 2 conductors. Draw line from controller to rain sensor installation location.
For proper system monitoring, consider installing an irrigation water meter to track water usage and detect potential leaks.
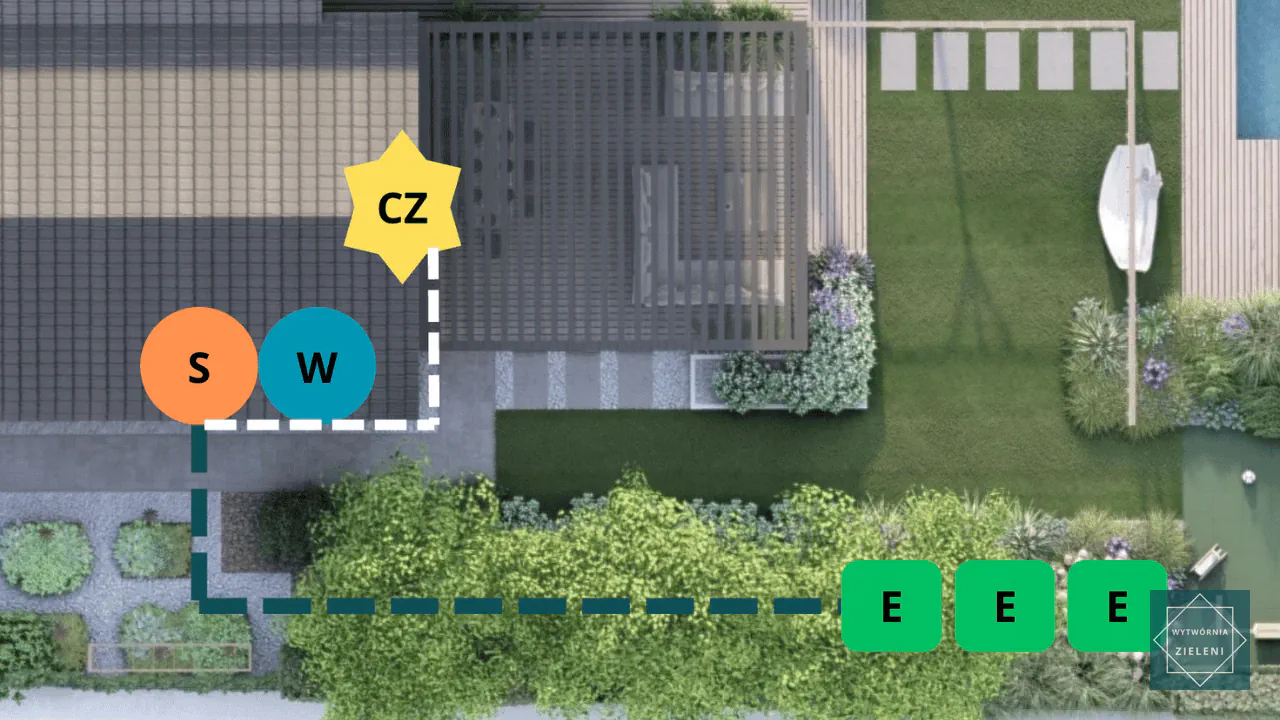
230V Power Supply Information
- Controller power supply: controller requires 230V power supply
- Pump power supply: If using pump, it requires 230V power supply (or 400V for large pumps)
Final Notes
Telecommunication and power supply wires should be placed in locations easy for excavation execution. Ensure all wires are well-protected and routed according to installation regulations.
After completing this step, your design will be ready for implementation, considering both hydraulic and electrical installation, ensuring full irrigation system functionality.
Step 11: Irrigation Table Completion and Design Element Measurements
In this phase, you'll complete irrigation table with detailed data regarding wires, pipes, and irrigation zones. Below you'll find step-by-step instruction.
Automatic Zone Addition in Table
- If all sprinkler data (Step 2) and drip line data (Step 3) have been completed, zone numbers automatically appear in table.
- Check that all zones have been properly assigned.
Pipe and Wire Length Measurement
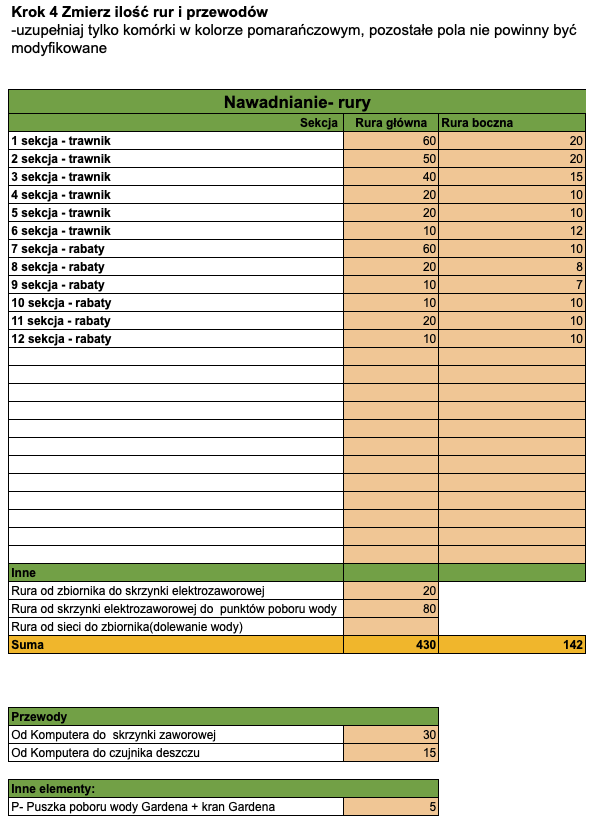
- Main and lateral pipe length measurement for sprinklers: Measure main pipe length for zone #1 with ruler and enter result in table. Measure lateral pipe length for zone #1 and enter result. Repeat these steps for each subsequent sprinkler zone.
- Pipe length measurement for drip irrigation: Measure main and lateral pipe lengths for each bed zone. Enter measurements in appropriate table columns.
- Other pipe length measurement: Measure all other pipe lengths on design, e.g., to water outlets or tank. Record results in appropriate table sections.
- Wire length measurement: Measure telecommunication wire lengths on design (to valve boxes and rain sensor). Enter results in table according to its structure.
Final Notes
Check that all table values are correct and correspond to design data. Ensure pipe and wire lengths comply with actual design requirements.
After completing table and entering measurements, your design will be ready for implementation, with all data precisely adapted to irrigation system needs. For professional installation guidance, see our sprinkler system installation guide.
Shopping List - Design Finalization
Final step involves preparing complete shopping list containing all elements necessary for irrigation system implementation. Thanks to previous steps (1-4), most information completes automatically.
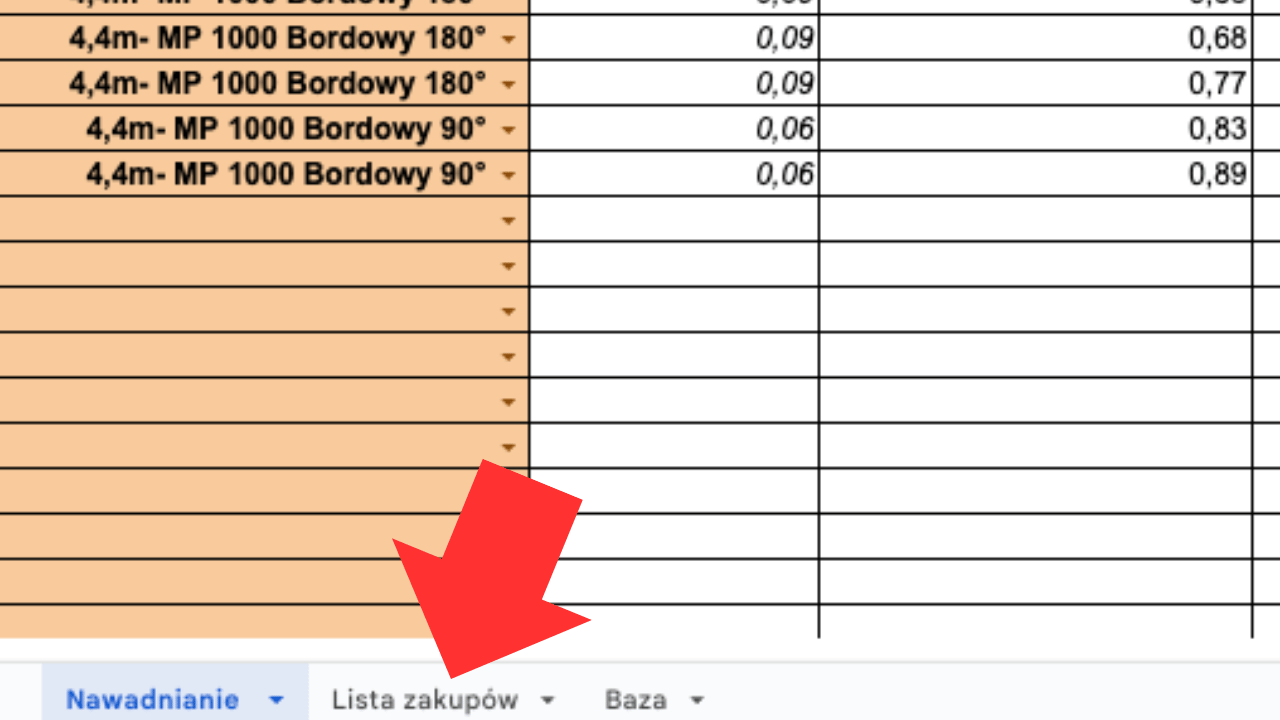
Automatic Shopping List Completion
Ensure all elements have been properly measured and entered in table during previous stages:
- Sprinklers
- Main and lateral pipes
- Telecommunication wires
- Drip line zones
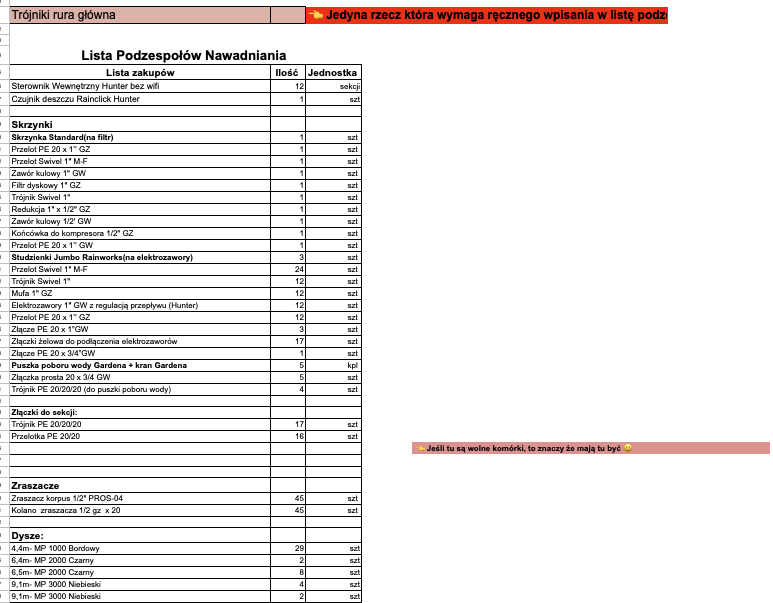
If data was entered correctly, 99% of items in "Shopping List" tab complete automatically.
Shopping list tab showing comprehensive component breakdown with quantities, specifications, and total project cost estimation
Manual Main Pipe Tee Completion
Open "Shopping List" tab in table. In "Main pipe tees" field, calculate and enter: Number of tees needed to connect main pipes according to design.
Tees dividing main pipe to individual sprinklers calculate automatically.
Shopping List Verification
Review all shopping list items and ensure they comply with design and measurements. If you notice missing elements, add them manually to list.
Final Notes
After completing shopping list, your design is ready for implementation - list contains all necessary elements, facilitating purchases and installation. Check that shopping list includes additional elements such as spare parts or installation accessories.
Thanks to well-completed shopping list, you'll save time and avoid problems during design implementation. You can easily assemble garden irrigation kit.
Summary
Designing garden irrigation system may seem complicated, but thanks to organized step-by-step approach, entire process becomes simpler and clearer. Key stages we've discussed allow creating system perfectly adapted to your garden needs.
Ready Design - What's Next?
With complete design, you can proceed to irrigation system implementation in your garden. If you need additional help, use our guides or contact professionals. For professional system evaluation and optimization, explore our landscape design examples to see successful implementations.
Related posts that may interest you: How does garden irrigation work?
Your garden deserves best solutions, and well-designed irrigation system is investment in beauty and functionality of your space. For comprehensive garden planning that integrates irrigation from the beginning, explore our modern garden design approaches. 🌱
Master Professional Irrigation Design with Expert Guidance
Creating a comprehensive irrigation system design ensures optimal water distribution, prevents costly mistakes, and maximizes your garden's potential. Professional design principles combined with proper planning tools deliver results that last for decades.
Ready to create the perfect irrigation blueprint for your property? Get a professional garden design consultation and discover how expert planning can bring your efficient irrigation vision to life.

FAQ
Can I Design Irrigation Online?
Online irrigation design is a convenient service allowing irrigation system design without requiring designer site visits. Entire process occurs remotely using photos, property maps, and detailed garden information. This enables quick and professional system planning adapted to individual needs.
What is Irrigation System Design?
Irrigation system design is process of creating schematic that considers pipe placement, sprinklers, and other system elements to effectively water all garden areas. Professional irrigation system design ensures optimal water use and minimizes waste. For cost estimation of complete systems, get a landscape design cost assessment.
Rain Bird vs Hunter - Irrigation Design Compatibility?
Rain Bird is renowned brand specializing in irrigation design and providing high-quality irrigation system components. Choosing Rain Bird products ensures durability, efficiency, and advanced technology that facilitates irrigation management. While this guide references Hunter MP Rotator nozzles, Rain Bird equivalents work equally well.
How Does Online Garden Irrigation Design Work?
Online garden irrigation design enables quick and convenient irrigation system creation. Process includes sending property data such as dimensions, soil type, and vegetation, then preparing personalized design easily implementable on your property. For comprehensive online design services, contact our landscape architecture firm for professional consultation.

Wojciech Kazimierowicz – Author of the Article
Co-owner of Wytwórnia Zieleni and an expert in garden design and landscaping with over 13 years of experience. He specializes in creating modern, functional green spaces tailored to the budget and needs of homeowners.

Find Out How Much Your Garden Design Will Cost!
Take a quick quiz and discover the estimated cost of a custom garden design tailored to your needs. No strings attached – it takes just 2 minutes!


Wytwórnia Zieleni | Garden Design
KRS 0001107384 NIP 6452587627 REGON 528715049 St. Strzelców Bytomskich 51/1 42-600 Tarnowskie Gory, Poland
Resources
© Wytwórnia Zieleni 2026


